Secure Shell (SSH) as defined in RFC4251 is a protocol for secure remote login and other secure network services over an insecure network. SSH consists of three main components: transport layer protocol, user authentication protocol and the connection protocol.
The transport protocol for SSH 2.0 as elaborated in RFC4253 provides a secured channel over an insecure network by performing host authentication, key exchange, encryption and integrity protection, and also deriving unique session ID that can be used by higher-level protocols.
The authentication protocol as elaborated in RFC4252 provides a suite of mechanisms that can be used to authenticate the client user to the server. There are three authentication mechanisms for SSH: public key authentication, password authentication, and host-based authentication.
The connection protocol as elaborated in RFC4254 specifies a mechanism to multiplex multiple data channels into a single encrypted tunnel over the secured and authenticated transport. The channels can be used for various purposes such as interactive shell sessions, remote command executions, forwarding arbitrary TCP/IP ports/connections over the secure transport, forwarding X11 connections, and accessing the secure subsystems on the server host.
Passwordless SSH Authentication Explained
This explanation can be somewhat lengthy and theoretical. You can skip to the setup part here.
Passwordless SSH can be considered another way of expressing SSH public key authentication especially without setting up a passphrase for the client key. A client host that wants to authenticate itself to a remote / target host, will have had its public key copied to and stored at the target host. The target host will then allow login from the client host by proving that the client host owns the private key that matches with the public key stored by the target host.

Figure 1 describes the public key authentication mechanism in SSH. As a prerequisite, the client generates its SSH key pair (the private and public key). After the client keys are generated, the client’s public key is exported / copied to the target host’s authorized public key list (Step 0). Additional configuration is performed on the server to allow public key authentication. This is necessary since in popular SSH server implementation such as OpenSSH, the default authentication method is password authentication.
SSH handshake is a mechanism for a client and server to establish a secure, encrypted communication channel for sending and receiving data. The handshake consists of several steps: protocol version exchange, key exchange, construction of new keys, and service request. Among these steps, the key exchange (KEX) represents the beginning of SSH authentication process. SSH 2.0 requires that Diffie-Hellman key exchange protocol be applied as the key exchange method.
During a key exchange (Step 1), client and server will each generate one-time / ephemeral session key pair. Client sends its ephemeral public key to the server in a SSH_MSG_KEXDH_INIT message and server responds with a SSH_MSG_KEXDH_REPLY message that provides the client with server’s ephemeral public key, server’s host public key, and the signature of the exchange hash. With this information, client will perform the following actions:
- Server authentication: Client authenticates the server based on the host public key received from the server. The server identity can be initially unknown for the client so that it has to be added into the list of trusted hosts, which is usually stored in ~/.ssh/known_hosts file.
- Shared secret and exchange hash construction: The client derives the shared secret from the server’s ephemeral public key and the exchange hash from the exchange hash signature. The shared secret and exchange hash will be used to create the keys for encrypting communication channel between the client and server.
Key exchange can be performed several times in a SSH connection. The exchange hash that is generated on the first key exchange is used as the session ID for the rest of SSH connection between the client and the server. This means that when the client or server performs key re-exchange to generate new ephemeral keys (especially in a long-running / persistent SSH connection), the client and server keep the same the same session ID despite the change in shared secret and exchange hash.
In Step 2, the client signs the session ID with its private key and sends authentication request to the server in a SSH_MSG_USERAUTH_REQUEST message. This message also contains client’s public key. In Step 3, the server will perform the following actions when receiving the message:
- Client’s public key authorization: Server checks if the client is authorized to use public key authentication by going through its list of authorized public keys. If it cannot find the client public key in the list, the server will reject the authentication request and send SSH_MSG_USERAUTH_FAILURE message to the client.
- Client authentication through signature check: Server uses the client public key to decrypt the signature and verify that the client and session ID info contained in the signature is correct.
If the server can confirm the authorization of the client’s public key and also verify the signature, it will notify the client that the authentication is successful by sending SSH_MSG_USERAUTH_SUCCESS message as represented in Step 4. Client follows up by sending SSH_MSG_SERVICE_REQUEST to request a service. There are two predefined services in SSH 2.0: ssh-userauth for authentication service and ssh-connection for remote session service.
Let’s say the client requests the remote session service after successfully getting authenticated and needs to establish an interactive session. The client proceeds with sending SSH_MSG_CHANNEL_OPEN message to request the server to open a data channel. After the channel is opened, the client can specify the classification / type of the request sent through the channel by sending SSH_MSG_CHANNEL_REQUEST message. There are several request types, for example “shell” for remote shell, “env” for environment variable, or “exec” for remote command. Client proceeds with sending initial data for the request in SSH_MSG_CHANNEL_DATA message and remaining data, if any, in SSH_MSG_CHANNEL_EXTENDED_DATA. After data is transferred and request is completely processed, the server can send SSH_MSG_CHANNEL_CLOSE to close the channel. By receiving this message, the client can decide further action, for example disconnecting from the server by sending SSH_MSG_DISCONNECT message.
Figure 2 depicts the sequences of messages exchanged between the client and server when the client approaches the authentication using passwordless SSH. As can be seen in the picture, authentication is not a standalone process. It is interlinked with the subsequent actions to be invoked on the target host such as remote command execution, remote shell session, subsystem access, or X11 forwarding.
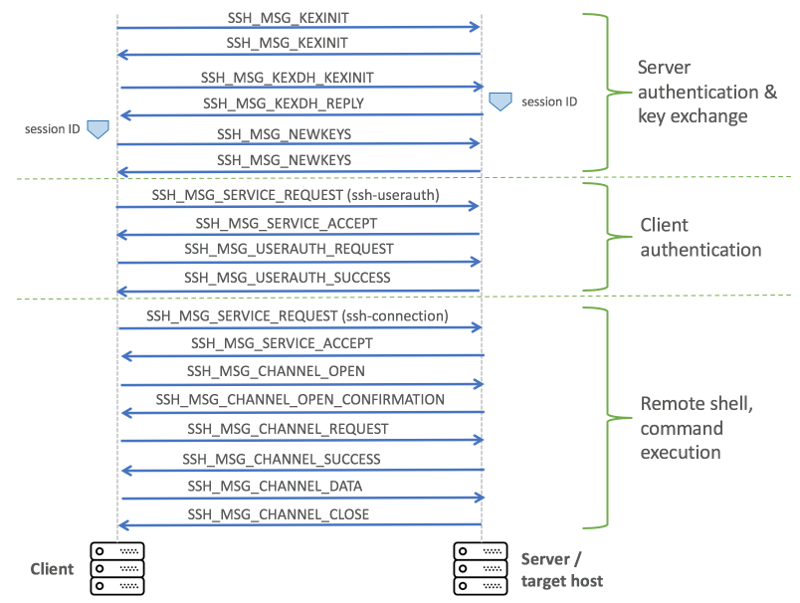
It is important to note that message sequences exchanged between the client and server post the authentication process can be different with what’s shown on Figure 2. The sequences provided in the picture are exemplary and do not cover all the request types that are supported by the SSH connection protocol.
Password vs Passphrase
The default authentication in SSH is password authentication. The client authenticates against the server / target host by supplying a user name on the server and the password for the user. In public key authentication, the client authenticates against the server by supplying a user name on the server, client’s public key and signature that contains the session ID of the SSH connection.
When creating the SSH key pair, the SSH key generator may ask the user to create a passphrase. The passphrase is used to “unlock” the private key so that it can generate the signature. If user does not assign a passphrase, the private key is always “unlocked” and can immediately generate the signature.
Passwordless SSH involves both generating SSH key pair without a passphrase on the client side and authenticating against the server using client public key instead of the password for the user on the server side.
Passwordless SSH Setup on Ubuntu
To demonstrate passwordless SSH authentication, we will run a small testbed on Digital Ocean. You can sign up for a Digital Ocean account if you want to create a similar environment and follow all the steps listed in this article. Alternatively, you can set up the testbed on your own infrastructure and adapt the steps to your environment.
Figure 3 describes the network layout for the demonstration. The testbed consists of two machines. The first machine is the client and the latter is the server / target host. The machines are located in the Digital Ocean data center. Each is assigned both private and public IP addresses. The public IP address is accessible from the Internet. However, the private IP is only accessible from the data center network. The user is located in a home network and should access the machines through the Internet.
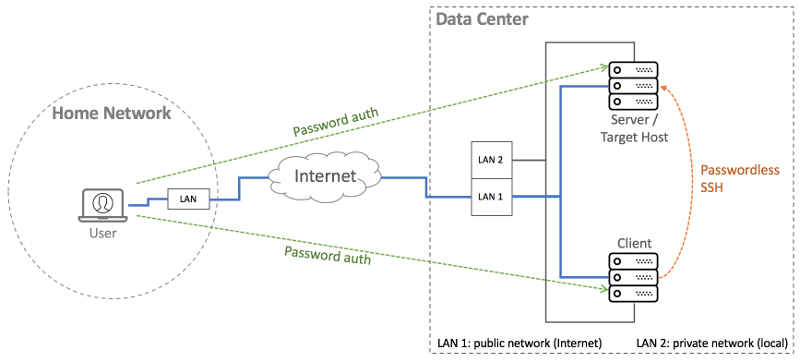
The user authenticates against the client and server machine with password authentication. The client machine will be configured so that it can use passwordless SSH to authenticate against the server machine.
Step 1: Create the machines for the testbed and assign a private IP to each machine
This step is specific to Digital Ocean. You can skip this when setting up on your own infrastructure.
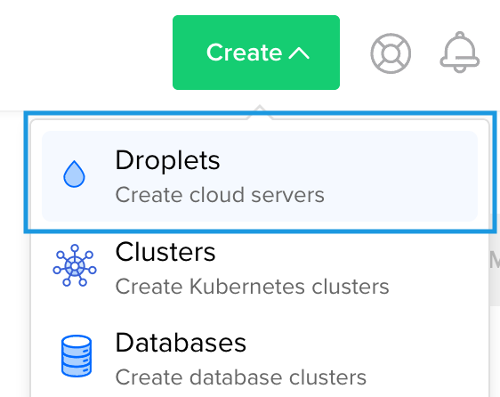
Log in to your dashboard and create a new droplet by clicking the “Create” button at the top and choose “Droplets”.
Configure the droplets as follows:
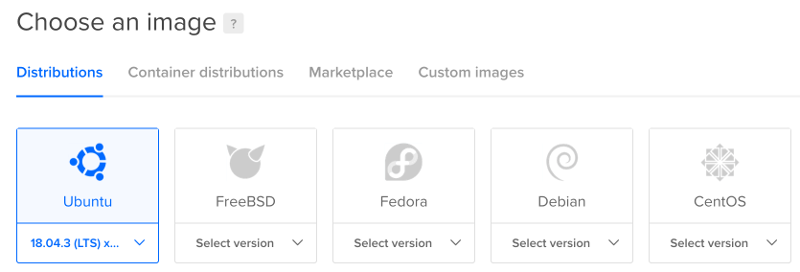
– From “Choose an image” section, choose Ubuntu as the image type.
– From “Select additional options” section, check the “Private networking” option

– From “Authentication” section, choose “One-time password” option

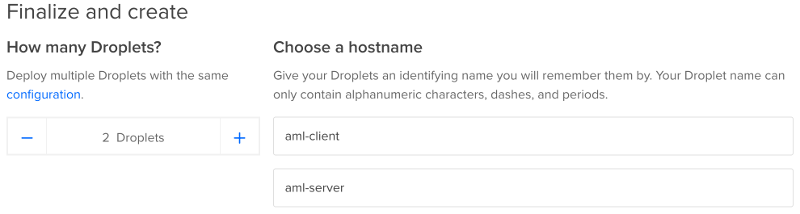
– From “Finalize and create” section, create two droplets and assign name for each host
Click “Create Droplet” button at the end of the page to finish the configuration and begin creating the droplets. After the droplets are created, they will be listed in the droplet list as shown below.

Step 2: Create a user for passwordless SSH authentication
Performing passwordless SSH authentication as root user is not recommended. A better approach is to create a non root user and delegate passwordless SSH authentication to the user. In this demonstration, we will create a user named “devops” on each machine.
– Login as root to the client machine
$ ssh root@CLIENT-PUBLIC-IP– Create “devops” user for passwordless SSH
root# adduser devopsSample output:
root@aml-client:~# adduser devops
Adding user `devops' ...
Adding new group `devops' (1000) ...
Adding new user `devops' (1000) with group `devops' ...
Creating home directory `/home/devops' ...
Copying files from `/etc/skel' ...
Enter new UNIX password:
Retype new UNIX password:
passwd: password updated successfully
Changing the user information for devops
Enter the new value, or press ENTER for the default
Full Name []: Devops
Room Number []:
Work Phone []:
Home Phone []:
Other []:
Is the information correct? [Y/n] Y
– Obtain the private IP of the client machine
root# ifconfig -aSample output:
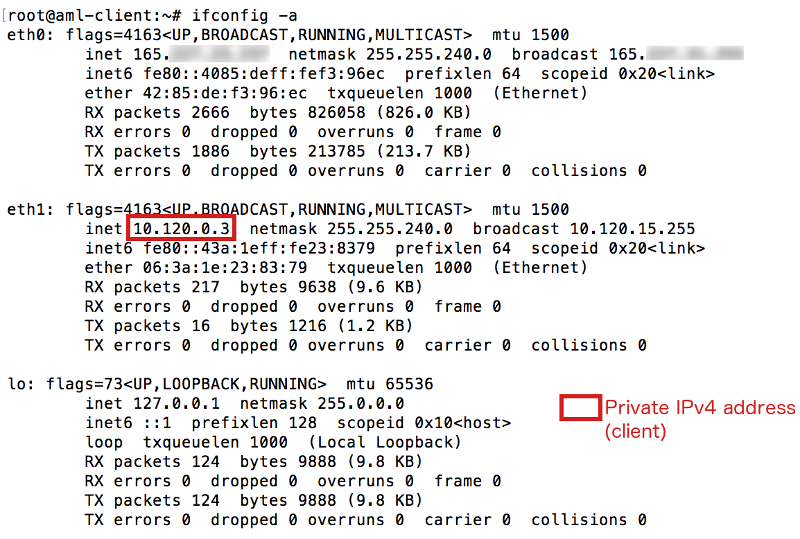
– Logout from the client machine
root# exit– Open another terminal and login as root to the server machine
$ ssh root@SERVER-PUBLIC-IP– Create “devops” user for passwordless SSH
root# adduser devopsSample output:
root@aml-server:~# adduser devops
Adding user `devops' ...
Adding new group `devops' (1000) ...
Adding new user `devops' (1000) with group `devops' ...
Creating home directory `/home/devops' ...
Copying files from `/etc/skel' ...
Enter new UNIX password:
Retype new UNIX password:
passwd: password updated successfully
Changing the user information for devops
Enter the new value, or press ENTER for the default
Full Name []: Devops
Room Number []:
Work Phone []:
Home Phone []:
Other []:
Is the information correct? [Y/n] Y
– Obtain the private IP of the server machine
# ifconfig -aSample output:
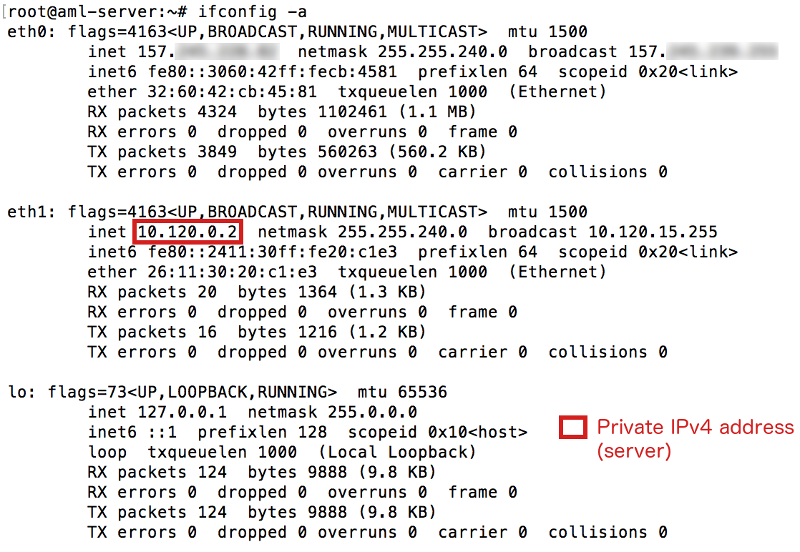
– Logout from the server machine
# exitStep 3: Create SSH key pair on the client machine
We will generate the SSH key pair for the “devops” user on the client machine and authorize the public key when logging as “devops” user on the target machine.
– Login as devops user to the client machine.
$ ssh devops@CLIENT-PUBLIC-IP– Create SSH private/public key pair without passphrase
$ ssh-keygen -t rsa -f ~/.ssh/id_rsaSample output:

From the command above, the option “-t rsa” is used to specify RSA algorithm as the cryptographic algorithm with private key length of 2048 (default key length in OpenSSH). The option “-f ~/.ssh/id_rsa” is to specify the name and location of the private key file and implicitly the public key file.
It is important to note that you should not provide passphrase when generating the keypair. Simply press enter when you’re prompted with the passphrase input.
– Verify that private and public keys have been created
$ ls ~/.ssh/Sample output:

From the sample output above, id_rsa is the private key file and id_rsa.pub is the public key file.
– Logout from the client machine
$ exitStep 4: Copy client public key to the target host / server machine
For demonstration purpose, we will use scp to copy the client public key to the target host.
– Login as devops user to the target host
$ ssh devops@SERVER-PUBLIC-IP– Create a directory named “.ssh” (without the quote) in the user home directory
$ mkdir ~/.ssh– Change the directory permission to 700
$ chmod -R 700 ~/.ssh– Copy the client public key using scp and rename it as authorized_keys
$ scp devops@CLIENT-PRIVATE-IP:/home/devops/.ssh/id_rsa.pub ~/.ssh/authorized_keysNote: this is a one-time action. If we want to authorize more public keys, we must append to authorized_keys file instead of creating a new one
– Change the permission of authorized key file to 600
$ chmod -f 600 ~/.ssh/authorized_keys– Confirm the files in the .ssh directory
$ ls ~/.sshSample output:

– Logout from the target
$ exitStep 5: Confirm passwordless SSH login from client machine to the target host / server machine
– Login as devops user to the client machine
$ ssh devops@CLIENT-PUBLIC-IP– Login to the target host / server machine with passwordless SSH and verify that no password is required in the process
$ ssh -v devops@SERVER-PRIVATE-IPThis time we use -v option to enable the verbose mode, which displays the debug message, so that we can analyze what’s happening under the hood. Sample output is provided below.

We can see from the image above that the passwordless SSH authentication with OpenSSH overall follows the SSH 2.0-related specifications and the sequences of the messages exchanged resemble those described in Figure 2. Another thing to note, during the key exchange, the client will authenticate the server. Initially, the client does not have information about the server. If the client trusts the server, it will store the hash of server info and public key to the ~/.ssh/known_hosts file.
When the server is reinstalled or IP address is taken by another server, the server public key will also change. As a result, the server authentication will always fail, which results in failed login to target host. As a remedy, we need to remove the known_hosts file on the client side and trust the new server public key.
Appendix A: Passwordless SSH without Specifying a User Name
Specifying username when connecting to the target host is not always necessary. When the client does not specify the user name in the target host, the current user name used by the user to log in to the client machine will be supplied to the target host. This is very handy in simplifying the login command.
In our testbed, we created “devops” user on both client and server machines. After logging in into the client machine as devops user, we can login to the server machine as the same “devops” user without specifying the user name.
– Login to the client machine
$ ssh devops@CLIENT-PUBLIC-IP– Login to the server machine as the same user with passwordless SSH and without specifying the user name
$ ssh SERVER-PRIVATE-IPSample output:
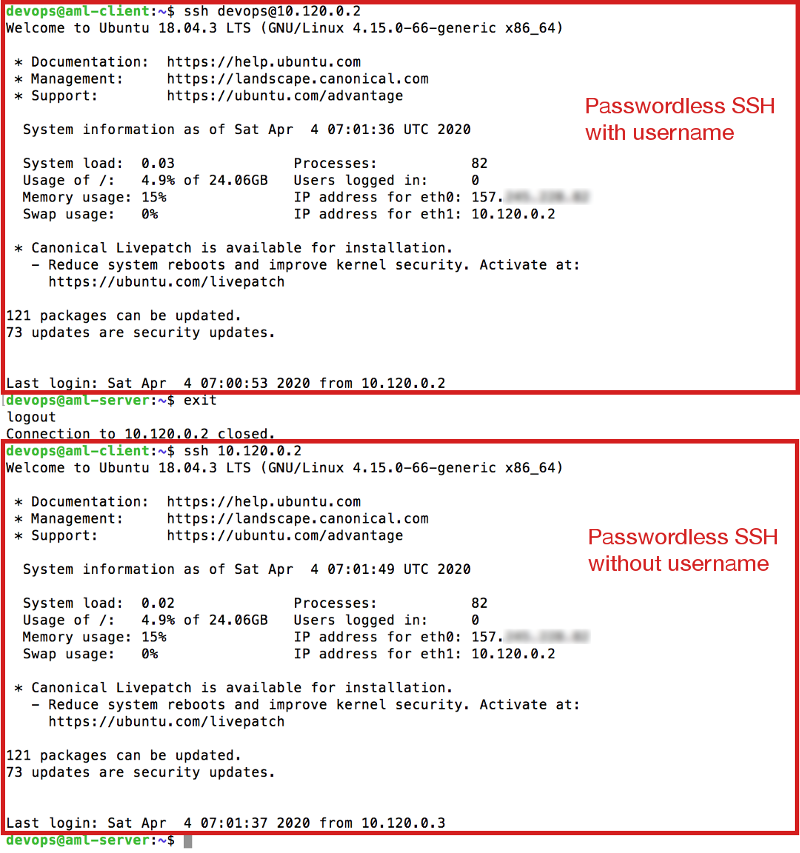
As can be seen in the image, connecting to the server machine with or without user name produces the same result.
Appendix B: Additional SSH Configuration on the Server Side
It is mentioned earlier that connecting as root user to a remote host is not a good idea. We can disable remote root login by configuring the SSH server. Additionally, we can set up the number of authentication retries so that server will simply reject authentication request after certain number of failed attempts. The steps are as follows:
– Login as root to the server
$ ssh root@SERVER-PUBLIC-IP– Add the user used in passwordless SSH scheme into sudo group so that it can execute commands with root privileges
root# usermod -aG sudo devops– Edit SSH server configuration file to disable remote root login and also to set up connection timeout (e.g. one minute)
# vi /etc/ssh/sshd_config
...
PermitRootLogin no

MaxAuthTries 5
...
– Restart the SSH daemon
# systemctl restart sshd– Logout from the server
# exit– Verify that root login is now disallowed
$ ssh root@SERVER-PUBLIC-IPYou will get an error message even though the correct root password is supplied
Permission denied, please try again.Closing Remarks
While the passwordless SSH setup is not complex, there is more nuance with the minutiae of messages exchanged between the client and server for the authentication purpose. Displaying the debug messages when performing SSH login provides better insight about the state of interaction between client and server as well as the usually hidden details, which may help troubleshoot a case of failed authentication.
One small error on this line:
$ scp devops@CLIENT-PRIVATE-IP:/home/devops/.ssh/id_rsa ~/.ssh/authorized_keys
should be:
$ scp devops@CLIENT-PRIVATE-IP:/home/devops/.ssh/id_rsa.pub ~/.ssh/authorized_keys
Thanks for spotting the error. It has now been corrected. For those who may ask why it was an error, id_rsa is the private key while id_rsa.pub is the public key. Only public key shall be shared with an external party for authentication purpose (hence, the public key authentication).