In the previous post, we revisited SSH public key authentication protocol that brought passwordless SSH to life. We perused and summarized the RFCs. To visualize the authentication process, we drew the arrows that highlight the sequences of messages exchanged between the client and the server.
Not to get overwhelmed with theories, we set up a mini lab to demonstrate how a client should authenticate itself against a remote server with passwordless SSH. We ran the experiment in a cloud environment provided by Digital Ocean.
And probably you may ask this question, “Why running the experiment in the cloud?”
The very simple answer to this is “to emulate the situations when passwordless SSH shines”.
Let’s go into more details by reviewing the use cases.
Passwordless SSH Basic Use: One Client, One Server / Target Host
You have a laptop. The laptop may run on Windows or MacOS. You read a tutorial article about developing and deploying a simple API server with Node JS and ExpressJS on Ubuntu. You decided to give it a try.
After writing the NodeJS code, you are ready to deploy the code to an Ubuntu server, which you do not have but can easily rent from a cloud provider. You can choose from developer friendly provider like Digital Ocean, versatile yet affordable Alibaba Cloud, or more established names like AWS or Azure.
So you sign up for a cloud service and spin up a new Ubuntu machine to serve the API code.
Let’s draw the network diagram after the server is provisioned and running.
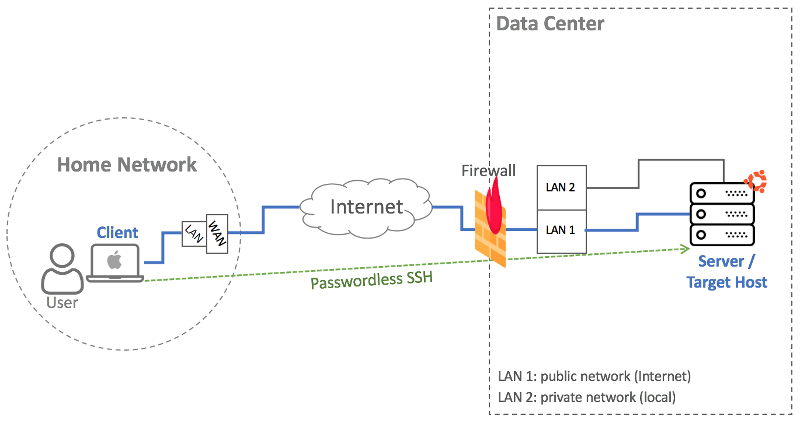
As you can see in the diagram, the laptop is connected to the home network. The newly spun Ubuntu machine is located inside the data center managed by the cloud provider. We enable private network when creating the machine so practically the machine is accessible from the internet with its public IP address and from other nodes in the same data center through its private IP address.
The default authentication method for accessing a remote machine via SSH is password authentication. Each cloud service provider, however, may apply different policy for authentication. For example, default SSH authentication on AWS is public key authentication, which is the superset of passwordless SSH authentication. In contrast, if you are using Digital Ocean, you can configure to login as root user using password.
For the rest of the article, the commands are executed on servers provisioned at Digital Ocean. You can sign up through the link and get $100 credit so that you can also try by yourself.
You may need to do some adjustment to the steps mentioned in this article if you run the commands in different environment.
Server Provisioning for Basic Use
We launch an Ubuntu machine from Digital Ocean dashboard and name it as “master”. We create a user named “devops” that will be used for passwordless SSH authentication.
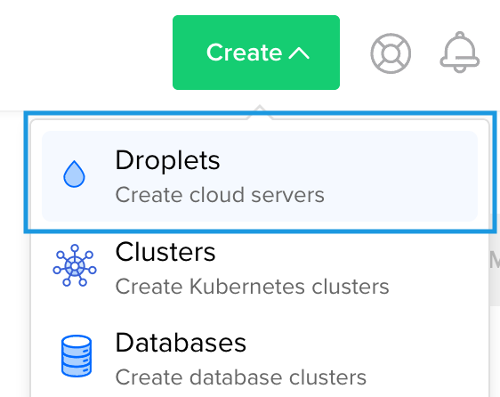
Step 1: Create the a new server instance
After logging into the dashboard, create a new server instance ( or droplet in Digital Ocean terminology) by clicking the “Create” button at the top and choose “Droplets”.
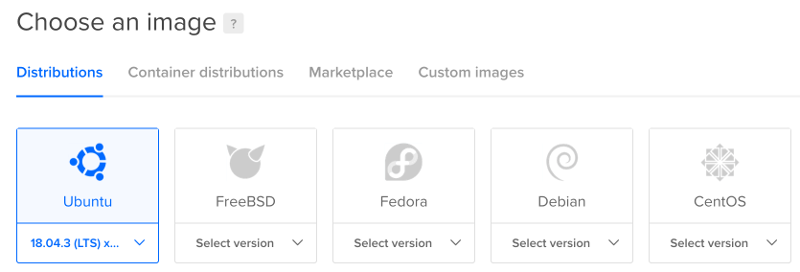
Step 2: Configure the parameters for server launch
– From “Choose an image” section, choose Ubuntu as the image type.
– From “Select additional options” section, check the “Private networking” option

– From “Authentication” section, choose “One-time password” option

– From “Finalize and create” section, create one droplet and assign name for the host. We use “master” as the host name in this article.

Step 3: Create a user for passwordless SSH authentication
It is recommended to access the server as a non root user and disable root login afterwards. We achieve this by configuring the newly launched server as follows.
– Login as root to the client machine
$ ssh root@SERVER-PUBLIC-IP– Create “devops” user for passwordless SSH
# adduser devops– Add the user used into sudo group so that it can later execute commands with root privileges
# usermod -aG sudo devops– Edit SSH server configuration file to disable remote root login and also to set up connection timeout (e.g. one minute)
# vi /etc/ssh/sshd_config
...
PermitRootLogin no

MaxAuthTries 5
...
– Restart the SSH daemon
# systemctl restart sshdAfter restarting the SSH daemon, we can proceed with the public key setup on the client side.
Passwordless SSH basic setup
In brief, basic passwordless SSH setup goes through these steps:
1. Client creates key pair (public key and private key) for SSH public key authentication.
2. Client copies the public key to the server.
3. Client authenticates against the server using passwordless SSH.
Three simple steps that do not look too intimidating.
How do we translate those steps into commands in the terminal / shell?
As a gentle reminder, in this basic setup, the client is the laptop and the server is the Ubuntu machine.
Step 1: Create client key pair for SSH public key authentication
If you are on Windows, you can use PuTTYgen, either the standalone binary (puttygen.exe) or the one packaged with PuTTY installer, to generate the SSH key pair. However, the key generation with PuTTY is not covered in this article.
If you are using MacOS, you can simply use the built-in ssh-keygen command to generate the key pair:
$ ssh-keygen -t rsa -f ~/.ssh/id_rsaWhen generating the key pair, you will be asked to provide a passphrase. The passphrase is used to encrypt the private key. If you set the passphrase, you will be prompted to type it when using public key authentication against a remote server. If you do not set a passphrase, you will be immediately authenticated and logged into the remote server without seeing the passphrase prompt.
For this kind of setup where the client for passwordless SSH authentication is a laptop, it is recommended to set up a passphrase when generating the key pair. The purpose is to add an extra layer of security especially in case of stolen laptop or undesired breach.
Step 2: Copy the public key to the server
We will copy the public key using inline remote command execution provided by the ssh client program.
From the ssh (client) manual on MacOS:
$ man ssh
SYNOPSIS
     ssh [-46AaCfGgKkMNnqsTtVvXxYy] [-B bind_interface] [-b bind_address] [-c cipher_spec] [-D [bind_address:]port] [-E log_file] [-e escape_char] [-F configfile] [-I pkcs11]
         [-i identity_file] [-J destination] [-L address] [-l login_name] [-m mac_spec] [-O ctl_cmd] [-o option] [-p port] [-Q query_option] [-R address] [-S ctl_path]
         [-W host:port] [-w local_tun[:remote_tun]] destination [command]
The interesting part of an ssh command is the [command] section where the client can specify the remote command to be executed on the destination, which is the remote server.
Here is how we copy the public key to the server by utilizing the inline remote command execution.
$ PUBKEY=$(cat /home/LAPTOPUSER/.ssh/id_rsa.pub); ssh "devops@SERVER-PUBLIC-IP" "umask 0077; mkdir -p .ssh; echo $PUBKEY >> .ssh/authorized_keys"The above script consists of two parts:
PUBKEY=$(cat /home/LAPTOPUSER/.ssh/id_rsa.pub)In this first part we set a variable named PUBKEY that stores the buffered output of the client public key file (id_rsa.pub).
ssh "devops@SERVER-PUBLIC-IP" "umask 0077; mkdir -p .ssh; echo $PUBKEY >> .ssh/authorized_keys"The second part is how we use SSH client program to execute remote command on the server according to ssh destination [command] syntax. The string devops@SERVER-PUBLIC-IP corresponds to destination and umask 0077; mkdir -p .ssh; echo $PUBKEY >> .ssh/authorized_keys represents [command].
The remote commands executed on the server to copy the client public key is further explained as follows.
umask 0077We set the file creation mode mask to 0077.
There are four octal digits in umask. The first digit is the mask for special file permission, the second digit is the mask for user permission, the third one for group permission, and the last digit is the permission mask for everybody else.
File permission is represented by three octal digits. The first digit is for user permission, the second digit for group permission, and the last digit is the permission for everybody else.
Each digit in file permission constitutes the aggregate value of three permission types: “read” permission with octal value of 4, “write” permission with octal value of 2, and “execute” permission with octal value of 1. If we sum up the “read”, “write” and “execute” permissions, we will have a value from 0 to 7.
A file with permission 750 (or rwxr-x---) means that the user has read, write, and execute permission (the octal digit 7). Other user in the same group can read and execute (the octal digit 5). Conversely, everybody else does not have any permission to read, write, or execute the file (the octal digit 0).
When we set the mask on a permission digit, we mean to not give the permission for the corresponding class of user. So umask 0077 means that we will not give any “read”,”write”, or “execute” permission to other user in the same group and everybody else.
mkdir -p .sshWe create a directory named .ssh for storing the client public key. Because we set the umask to 0077 earlier, this directory will have permission with numeric value of 700 (or rwx------).
echo $PUBKEY >> .ssh/authorized_keysWe create a file named authorized_keys and put the client public key into the file. The newly created file will have permission with numeric value of 600 (or rw-------). This is since newly created file has default permission value of 666 and we previously set umask to 0077.
If the authorized_keys file already exists, the public key will be appended to it and the file permission is left unchanged.
Step 3: Test the passwordless SSH connection
Now we go on with testing and verifying that we can login to the server with passwordless SSH. We execute this command on the laptop.
$ ssh devops@SERVER-PUBLIC-IPAnd now we’re in.
Passwordless SSH Powerful Use: One Client, Multiple Target Hosts
You have deployed your first API server and somehow it becomes popular. So you need to provision another server and add a load balancer to split the traffic. After a while, your monolith API also becomes somewhat complex to manage. You decide to decompose the single service into a set of micro services. You deploy each service on a new server instance. What was initially only a simple server has now grown into tens of servers and counting.
Once the server count grows, it is time to rethink about the server infrastructure management. If you have, for example ten servers, performing same task on all ten servers may not be the best use of your time. You may think about automating the process of managing and performing maintenance on the servers.
There are some existing server infrastructure automation solutions, such as Ansible, Chef, or Puppet. Deciding which automation solution to invest in can be more nuanced than how it looks at the surface.
But as always, there is a recourse. Here is where passwordless SSH starts to shine.
You can use passwordless SSH to perform management tasks on all your servers at once.
Let’s draw the network diagram once again.
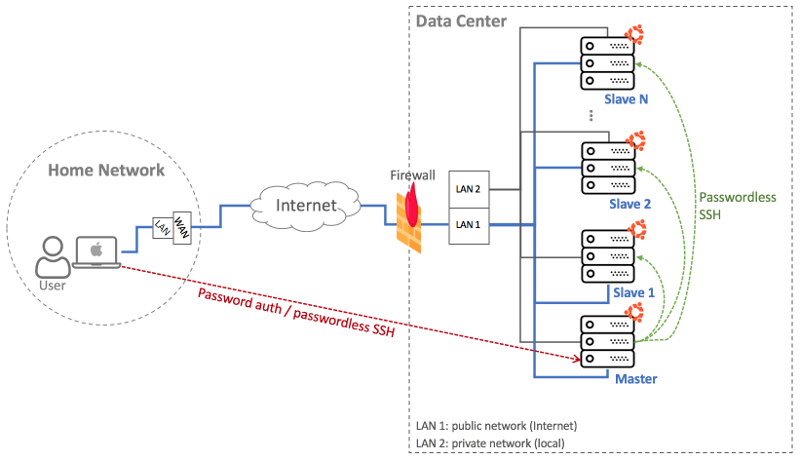
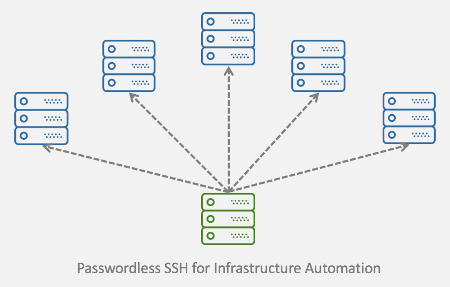
As shown in the diagram, there are now multiple server instances in the data center. Even though we can connect to each server from the Internet, we set it up so that by connecting to one server, which is the master node, we can also manage other servers. We name each of the remaining servers as slave node.
Server management is performed by first enabling passwordless SSH from the master node to all of the slave nodes. After passwordless SSH is set up, practically we can execute remote commands on all slave nodes without seeing the password prompt. This is the first level of automation to the server infrastructure that we can achieve without incorporating additional tools.
Simplifying Public Key Export
We will run another experiment on Digital Ocean to show how we can simplify the process of copying / exporting public key.
This experiment involves four nodes. The first node is the client, which is the master node. The target hosts are similarly named as slave1, slave2, and slave3. Private networking is enabled for all nodes.
Here is the droplet list after all nodes are created.

Let’s go through all the steps to setting up passwordless SSH from master to all slave nodes.
Step 1: Login to each node (master, slave1, slave2, slave3) and create a new user with passwordless SSH
In this example, we name the user as devops.
– Login as root to each machine
$ ssh root@[MASTER|SLAVE1|SLAVE2|SLAVE3]-PUBLIC-IP– Create devops user for passwordless SSH
# adduser devops– Add the user used into sudo group so that it can later execute commands with root privileges
# usermod -aG sudo devops– Edit SSH server configuration file to disable remote root login and also to set up connection timeout (e.g. one minute)
# vi /etc/ssh/sshd_config
...
PermitRootLogin no

MaxAuthTries 5
...
– Restart the SSH daemon
# systemctl restart sshdStep 2: Obtain the private IPs of all nodes and add the IP info to /etc/hosts
– Get private IP for current node (For Digital Ocean, the private IP uses 10.x.x.x address)
# ifconfig -a | grep -e '10\.'Sample output:

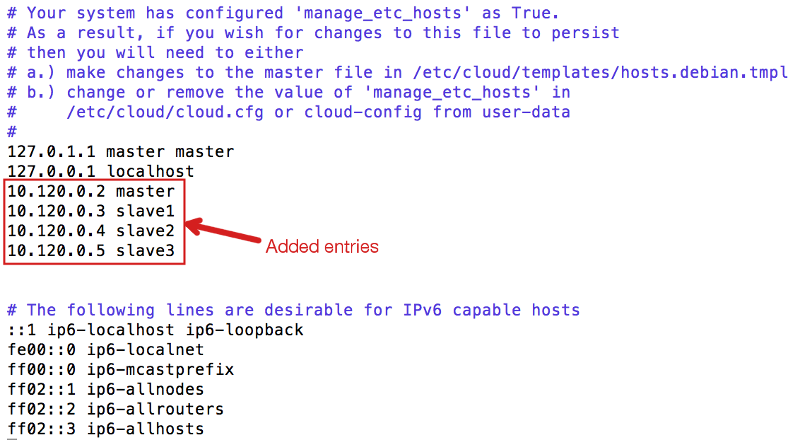
– Add private IPs of all nodes into /etc/hosts. Perform this on all nodes
# vi /etc/hostsSample output:
Step 3: Create SSH key pair on the client
The client in this example is the master node.
– Login to the master node as devops user
$ ssh devops@MASTER-PUBLIC-IP– Create SSH key pair. Leave the passphrase empty when creating the key pair.
$ ssh-keygen -t rsa -f ~/.ssh/id_rsaSample output:

Step 4: Copy the public key to all nodes at once
This is the main part where we simplify the process of exporting / copying the public key. In Step 1 and Step 2, we have to log in to each server to perform the tasks. However, in this current step we execute the command to copy the public key to all nodes just once.
First, we define the target hosts where the public key will be copied. We also include the client itself.
$ TARGETS=("master" "slave1" "slave2" "slave3");Next, we define the public key to be copied
$ PUBKEY=$(cat /home/devops/.ssh/id_rsa.pub);Since there are several hosts, we need to loop through each host to copy the public key. We reuse the same command previously used in one-client-one-target-host setup.
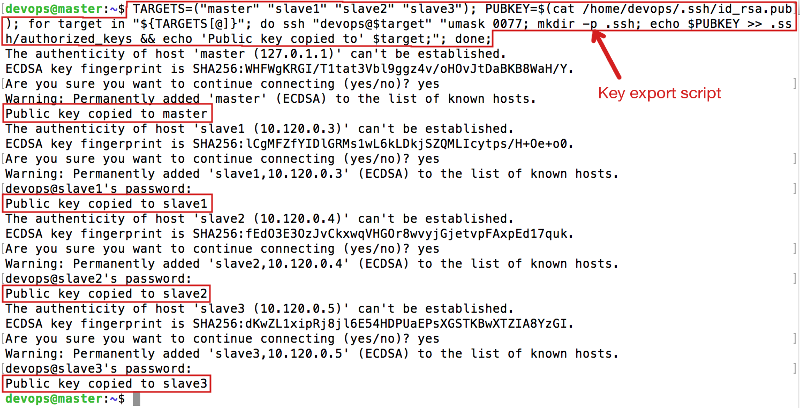
$ for target in "${TARGETS[@]}"; do ssh "devops@$target" "umask 0077; mkdir -p .ssh; echo $PUBKEY >> .ssh/authorized_keys && echo 'Public key copied to' $target;"; done;Finally, we put everything inline and execute the script for copying the public key.
$ TARGETS=("master" "slave1" "slave2" "slave3"); PUBKEY=$(cat /home/devops/.ssh/id_rsa.pub); for target in "${TARGETS[@]}"; do ssh "devops@$target" "umask 0077; mkdir -p .ssh; echo $PUBKEY >> .ssh/authorized_keys && echo 'Public key copied to' $target;"; done;Sample output:
Nicely done. Now we should be able to log in from master to all slave nodes with passwordless SSH. A quick test should confirm this.
$ ssh slave1Sample output:

Step 4 (alternative): Use ssh-copy-id to copy the public key to all nodes at once
Because all nodes are running Ubuntu, we can use ssh-copy-id to copy the public key to all nodes. The ssh-copy-id program itself is a shell script that expands on the remote commands we use to copy the public key from the client to the target hosts.
The one line command to copy the public key with ssh-copy-id will be as follows.
$ TARGETS=("master" "slave1" "slave2" "slave3"); for target in "${TARGETS[@]}"; do ssh-copy-id "devops@$target" && echo 'Public key copied to' $target"; done;The commands for exporting the public key are encapsulated in ssh-copy-id. As a result, the inline script now looks more concise.
Passwordless SSH for Server Infrastructure Automation
Passwordless SSH opens the door for further server infastructure automation. Since password is not needed to perform task remotely on the target host, we can create scripts that perform management or maintenance tasks on the servers without human interaction. The scripts can be scheduled to run periodically or at certain time, or triggered by certain event.
As an example, we can create a script that take the snapshot of user directory every day. Instead of setting cron job on all nodes, we simply create a script on the master node and set a cron job to run the script only on the master node. This simplifies the amount of time and effort needed to perform the task.
The minimal script for the example will look like as follows.
$ vi take_dir_snapshot.sh

#!/bin/bash

TARGETS=("master" "slave1" "slave2" "slave3");

for target in "${TARGETS[@]}"
do
ssh "devops@$target" "{ date; ls -Al; echo "";} >> snapshot.log"
done
If we execute the script manually from the master node, we will notice that the snapshot.log file is created on all nodes.
$ chmod u+x take_dir_snapshot.sh
$ ./take_dir_snapshot.sh
After adding a cronjob entry on the master node, the snapshot task for all nodes is now scheduled to run automatically everyday.
$ crontab -e
...
# Take directory snapshot of all nodes every 2AM in the morning
* 2 * * * /home/devops/take_dir_snapshot.sh
...
Conclusion
Passwordless SSH is more than a way to remove some keystrokes when logging in to the remote server. It can also be very usable to automate server administration. Proper infrastructure planning and understanding about the network layout can ease the passwordless SSH configuration and bring passwordless SSH to more effective use.
This article is worthy of recognition and comment. I found this material attention-grabbing and engrossing. This is well-scripted and highly informative. These views appeal to me. This is how real writing is done. Thank you.