
In this post, we will explore a small quirk of MacOS. The title should be self-explanatory but might not be so obvious to heavy GUI users. Let’s take a closer look into this seemingly-feature-not-bug behavior on MacOS.
Time Machine is a built-in tool on MacOS for performing partial or full system backup. Time Machine works by taking snapshots of the system and storing those snapshots at external storage devices connected to the machine. To restore the backup, another built-in tool named Migration Assistant is used. Both Time Machine and Migration Assistant are GUI tools. These built-in tools enable users to conveniently transfer or migrate the content of an old Mac, be it documents, user accounts and settings, to a new Mac.
A full backup created with Time Machine can be restored by Migration Assistant through simple GUI-based flow. The process of copying all files from old Mac to the new Mac handled by Migration Assistant is performed with minimum user intervention. This really saves the time compared to performing the data transfer or copying manually.
To use Time Machine, a user will click the Apple icon ![]() in the upper left corner of the screen and then select System Preferences > Time Machine. The active window will display the configuration for Time Machine as can be seen in the following picture.
in the upper left corner of the screen and then select System Preferences > Time Machine. The active window will display the configuration for Time Machine as can be seen in the following picture.

The option “Back Up Automatically” is not checked by default. This means that user manually performs backup by navigating to Time Machine tool and interacting with the GUI flow for the backup. Once automatic backup is checked, Time Machine will alter its behavior to create backups in the background without user intervention. The default interval between backups is one hour. The backup files or “snapshots” are stored in backup disk specified by the user in the Time Machine configuration.
By specifying the external backup disk, user might be not aware of the intricacy of Time Machine description that is shown on the configuration window.
Time Machine keeps:
- Local snapshots as space permits
- Hourly backups for the past 24 hours
- Daily backups for the past month
- Weekly backups for all previous months
The oldest backups are deleted when your disk becomes full.
That sounds pretty normative and somewhat intuitive for a backup procedure. But wait, isn’t this article about Time Machine gotcha?
Yes, indeed. A case in point is when we want to check remaining disk space from the Terminal before sinking overwhelming bytes to the machine by cloning tens of Node.js projects that each pulls more than 500MB dependencies to the node_modules directory. It is paramount that we have ensured that the remaining disk space is still sufficient.
We perform initial disk space check with df command from the Terminal.
$ df -PhWe had this output displayed by the command line on the test machine.
Filesystem      Size   Used  Avail Capacity   Mounted on
/dev/disk1s1   466Gi  426Gi   36Gi    93%    /
devfs          343Ki  343Ki    0Bi   100%    /dev
/dev/disk1s4   466Gi  3.0Gi   36Gi     8%    /private/var/vm
map -hosts       0Bi    0Bi    0Bi   100%    /net
map auto_home    0Bi    0Bi    0Bi   100%    /home
The output informs us that the disk is almost full at 93% capacity and there is only around 36GB of free space to use. This should have turned into an alert that urges the user to free up some disk space.
We then compare this output with the GUI, as a a reminder that not everybody uses the command line. On Mac, the GUI for checking available disk space can be found by clicking the Apple icon ![]() in the upper left corner of the screen and then choosing “About This Mac” menu followed by selecting the Storage tab.
in the upper left corner of the screen and then choosing “About This Mac” menu followed by selecting the Storage tab.
Here was the display from the GUI.
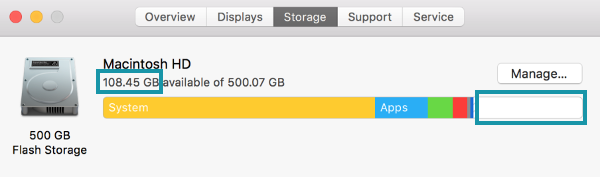
Oops, the GUI presents different information! As can be seen in the picture, the GUI reports there are still around 108GB of free disk space, or 3 times more than the value reported on the command line.
When we have this stark difference of free disk space info displayed on GUI vs command line, big chance that one of the culprits is Time Machine local snapshots.
Remember the Time Machine description? It says “Time Machine keeps local snapshots as space permits”. Interestingly, even though we perform manual backup through Time Machine, local snapshots are still created besides the snapshots on the external backup disk. In brief, Time Machine backup ? external disk backup AND local snapshot.
We can verify this by using a tool named tmutil, which as the name hints is a command line utility for Time Machine. This is an extensive utility, covering various operations related with Time Machine. The relevant operation or command under tmutil for listing the local snapshots is listlocalsnapshots, which should be invoked as follows.
Usage: tmutil listlocalsnapshots Since we will list the local snapshots inside the root directory, the mount point is therefore /. The command hence becomes:
$ tmutil listlocalsnapshots /We tried running the above command on the test machine and had the following output displayed.
Password:
com.apple.TimeMachine.2022-01-19-023844
The output tells us that there is indeed a Time Machine local snapshot. However, there is no further info on the size nor additional option/parameter in the command to embed information about the snapshot size in the output. This means that we can only know the size occupied by the local snapshots after invoking command to discard them and then calculating the free disk space reclaimed.
The Time Machine local snapshots can be purged partially or completely. Partial snapshot removal comes under the term “local snapshot thinning” that is associated with thinlocalsnapshots command.
Usage: tmutil thinlocalsnapshots [purgeamount] [urgency]If we want to completely remove the local snapshot, we use deletelocalsnapshots command instead.
Usage: tmutil deletelocalsnapshots A full Time Machine backup usually occupies sizable disk. We can showcase both snapshot purging options by performing the removal in two stages.
a. Stage 1: Partial removal.
Let’s try to remove 20GB (or 21474836480 bytes) from the local snapshot.
$ sudo tmutil thinlocalsnapshots / 21474836480 4Machine output:
Thinned local snapshots:
com.apple.TimeMachine.2022-01-19-023844
From the output, we can see that the snapshot still exists but the size should have been trimmed. However, we don’t know how big the remaining snapshot is.
b. Stage 2: Full removal
Our last resort to reclaim more space is by completely removing the local snapshot. For the test machine, this was the command used. Note that for snapshot_date argument, we took the date part of the snapshot file name.
$ sudo tmutil deletelocalsnapshots 2022-01-19-023844We confirm that the snapshot has been removed by listing the local snapshots once again.
$ tmutil listlocalsnapshots /The test machine did not list anything, which is great. In theory, this means that some free space has been reclaimed. This can be confirmed by running df command once again.
$ df -PhHere is what was shown on the test machine.
Filesystem      Size   Used  Avail Capacity  Mounted on
/dev/disk1s1   466Gi  373Gi   89Gi    81%    /
devfs          347Ki  347Ki    0Bi   100%    /dev
/dev/disk1s4   466Gi  4.0Gi   89Gi     5%    /private/var/vm
map -hosts       0Bi    0Bi    0Bi   100%    /net
map auto_home    0Bi    0Bi    0Bi   100%    /home
Deleting the snapshot freed up around 53GB of disk space. That’s quite an achievement. But wait! The numbers don’t really add up. GUI says around 108 GB of space is still available. Deleting the snapshot only sets the available disk space to 89GB. There is still a gap of around 20GB. What is that other “thing” considered by the GUI as available space?
It might be an elegant way of spending an afternoon trying to figure out the answer.