![]() When developing a deep-learning system, especially during the modeling stage, a lot of trials and errors can be involved in evolving the codebase. The easy remedy to reduce errors will be by using a robust IDE that provides productivity-boosting features such as code completion, method definition, codestyle suggestion, advanced debugging, user-friendly UI, and so forth.
When developing a deep-learning system, especially during the modeling stage, a lot of trials and errors can be involved in evolving the codebase. The easy remedy to reduce errors will be by using a robust IDE that provides productivity-boosting features such as code completion, method definition, codestyle suggestion, advanced debugging, user-friendly UI, and so forth.
Another element for better development experience is interactivity. Instead of writing the whole source code and evaluate everything, it is arguably more productive to write the code in small steps, with one line as the smallest unit, and evaluate the code up to the last line written. This kind of mechanism is possible for scripting language where the codes are interpreted. Node JS for example has a feature named Read-Eval-Print Loop (REPL) that enables someone to write Javascript code with Node JS and has it evaluated on the go. Deep learning algorithms and systems are often developed in Python, another interpreted language. Similar initiative also exists for Python in the forms of interactive shell and “notebook”. A notebook is an interactive environment, normally with web GUI support, where someone can combine code execution, text, rich media, charting and other types of data visualization. A popular notebook for Python is Jupyter Notebook, which was formerly known as IPython Notebook.
In this article, we will go into more details about Jupyter Notebook installation and configuration on Ubuntu 16.04. However, it’s important to note that the configuration depends on some pre-requisites. This article is the continuation of the previous article about TensorFlow installation. Please make sure you have read the article to understand the pre-requisites, otherwise some steps explained in this article may not work.
The pre-installation environment is as follows:
| Item | Value |
|---|---|
| OS | Ubuntu 16.04 |
| Python version | 2.7.12 |
| Python install method | virtualenv |
| User ID | MYUSER (change this into your user account) |
| Virtualenv path | ~/virtualenv/tensorflow or /home/MYUSER/virtualenv/tensorflow |
Installation Steps (Basic)
Step 1: Install ipython packages
$ sudo apt-get -y install ipython ipython-notebookStep 2: Activate the virtualenv
$ source ~/virtualenv/tensorflow/bin/activateAfter executing the command above, the prompt will be changed to:
(tensorflow) $Step 3: (virtualenv) Install jupyter module
(tensorflow) $ pip install jupyterStart 4: (virtualenv) Start jupyter server
(tensorflow) $ jupyter notebook --port 8888 --ip 0.0.0.0 --no-browserSample output:
[I 08:23:41.786 NotebookApp] Serving notebooks from local directory: /home/MYUSER
[I 08:23:41.786 NotebookApp] 0 active kernels
[I 08:23:41.786 NotebookApp] The Jupyter Notebook is running at:
[I 08:23:41.786 NotebookApp] http://0.0.0.0:8888/?token=47a46e2bb27da415a57d7d0743cfb28fedd7c71c93cf6905
[I 08:23:41.786 NotebookApp] Use Control-C to stop this server and shut down all kernels (twice to skip confirmation).
[C 08:23:41.786 NotebookApp]

    Copy/paste this URL into your browser when you connect for the first time,
    to login with a token:
        http://0.0.0.0:8888/?token=47a46e2bb27da415a57d7d0743cfb28fedd7c71c93cf6905
Step 5: Access Jupyter notebook GUI
To access the GUI, we open the browser and type the GUI address as hinted by the log output in Step 4. Note that the IP address 0.0.0.0 refers to all interfaces. This means that we can access the jupyter notebook locally (in case of desktop or server with GUI) using “localhost” or remotely by changing 0.0.0.0 with the server’s public IPv4 address.
Installing Jupyter Notebook as Service (Advanced Installation)
Manually starting Jupyter notebook may suffice for single user with less frequent use. If we use notebook extensively, it is better to install Jupyter as service that is started at boot time. Additionally, running Jupyter as service will enable remote access by more people, a common setting in a collaborative environment.
There can be two options for installing Jupyter as service: system-wide service or user service. We will install Jupyter as a user service that is always started at boot time. The configuration steps are explained as follows.
Step 6: Stop Jupyter server
Simply press Ctrl+C twice to stop the server
Step 7: Create notebooks directory. We will create the directory in user’s home directory
$ mkdir notebooksStep 8: Activate the virtual environment
$ source ~/virtualenv/tensorflow/bin/activateStep 9: (virtualenv) Obtain the path to Jupyter notebook executable
(tensorflow) $ which jupyterSample output: /home/MYUSER/virtualenv/tensorflow/bin/jupyter
Step 10: (virtualenv) Generate automatic password for Jupyter
$ jupyter notebook passwordSample output:
Enter password:
Verify password:
[NotebookPasswordApp] Wrote hashed password to /home/MYUSER/.jupyter/jupyter_notebook_config.json
Step 11: (virtualenv) Generate default Jupyter configuration
(tensorflow) $ jupyter notebook --generate-configStep 12: (virtualenv) Deactivate the virtualenv
(tensorflow) $ deactivateStep 13: Modify the default Jupyter configuration file
$ vi /home/MYUSER/.jupyter/jupyter_notebook_config.pyjupyter_notebook_config.py
...
c.NotebookApp.ip = '*'
c.NotebookApp.port = 8888
c.NotebookApp.open_browser = False
## Whether to allow the user to run the notebook as root.
c.NotebookApp.allow_root = True
...
More detailed explanation about the configuration parameters can be seen in the official documentation.
Step 14: Create a directory and file for Jupyter log file
$ mkdir -p ~/logs/jupyter
$ touch ~/logs/jupyter/jupyter.log
Step 15: Create a shell script to start Jupyter service. We name this script as start-jupyter-service.sh.
$ vi ~/start-jupyter-service.sh#!/bin/bash
. /home/MYUSER/virtualenv/tensorflow/bin/activate
nohup /home/MYUSER/virtualenv/tensorflow/bin/jupyter-notebook --config=/home/MYUSER/.jupyter/jupyter_notebook_config.py > /home/MYUSER/logs/jupyter/jupyter.log 2>&1 &Step 16: Add execution right to the shell script
(tensorflow) $ chmod u+x ~/start-jupyter-service.shStep 17: Create a file named jupyter.service in ~/.config/systemd/user/jupyter.service. We may need to create the directory first if it does not exist.
$ mkdir -p ~/.config/systemd/user
$ vi ~/.config/systemd/user/jupyter.service
jupyter.service
[Unit]
Description=Jupyter Notebook
AssertPathExists=/home/MYUSER/virtualenv/tensorflow

[Service]
Type=simple
PIDFile=/run/jupyter.pid
ExecStart=/bin/bash /home/MYUSER/start-jupyter-service.sh
WorkingDirectory=/home/MYUSER/notebooks/
Restart=always
RestartSec=10

[Install]
WantedBy=default.target
Step 18: Enable the service to start after system boot
– Enable MYUSER to keep running the service even though the user is not currently logged in
$ sudo loginctl enable-linger MYUSER– Automatically start the Jupyter service registered by MYUSER on every system restart
$ systemctl --user enable jupyter.serviceStep 19: Start the service
$ systemctl --user start jupyter.serviceTo stop the service:
$ systemctl --user stop jupyter.serviceTo check the service status:
$ systemctl --user status jupyter.serviceStep 20: Verify that Jupyter GUI is accessible
Open the browser, and access the server GUI address (e.g. localhost:8888 or server.name:8888 or 100.101.102.103:8888) and make sure the login UI is displayed similar with the picture below.

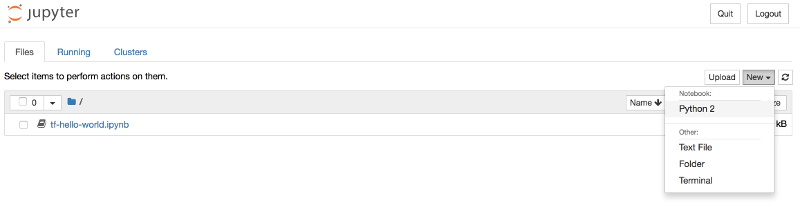
Step 21: Start using Jupyter notebook
After logging in with the password, you can now start using Jupyter notebook. The menu to create a new notebook is available at the upper right of the GUI.
Concluding Remark
Installing Jupyter notebook server as service can be better setup in a collaborative environment. If you have issue during the installation or have some tips and tricks that are not covered in the article, simply write in the comment section.
Excellent guide, it really worked!
I initially tried with a system service but had issues with the conda environments; using your approach made it work.
However, you missed two things:
Step 18: the command should be: `sudo loginctl enable-linger MYUSER` instead of zc-user 🙂
Step 18.5 (missing): you have to enable the service to make it run on reboot: `systemctl –user enable jupyter.service`
Thanks for the comment and correction. That part was missed when editing the initial commands executed on the target machine. The article has also been updated to reflect your correction.