![]() With advances in GPU technologies, performing complex computation is not an exclusive feat of multicore CPUs anymore. It is not uncommon to perform computation for linear algebra, image and video processing, machine learning (especially deep learning), graph analytics, and so forth on GPU.
With advances in GPU technologies, performing complex computation is not an exclusive feat of multicore CPUs anymore. It is not uncommon to perform computation for linear algebra, image and video processing, machine learning (especially deep learning), graph analytics, and so forth on GPU.
NVIDIA graphic cards have gained popularity among machine learning researchers and practitioners as the base hardware for GPU computing. To harness the GPU power, NVIDIA develops and provides CUDA toolkit that can be used as the development environment and libraries for GPU-accelerated applications.
If you are using Ubuntu 16.04 (Xenial) and want to install the recent release of CUDA toolkit (version 9.1), this post may help. The official installation guide is available at the NVIDIA website and can be referenced when following the steps outlined in this post.
Update: I have written a follow-up post about installation of CUDA 9.2. You can refer to the article if you want to go straight to CUDA 9.2 instead of 9.1.
Pre Installation
Prior to the installation, ensure that you have installed NVIDIA driver for Ubuntu. The driver installation is not covered in the post. The pre-installation steps are primarily checking if the system environment is ready for Cuda toolkit installation.
1. Update apt package index and install the newest version of all currently installed packages
$ sudo apt-get update
$ sudo apt-get upgrade
2. Verify that NVIDIA graphics driver has been installed properly.
You can refer to this article for NVIDIA graphics driver installation and functionality checking.
3. Verify the GPU is CUDA capable
$ lspci | grep -i nvidiaThe command lspci is used to display the devices connected to PCI buses. After invoking the command, you should see NVIDIA in the device list output. Sample output can be seen below.
01:00.0 VGA compatible controller: NVIDIA Corporation Device 1b06 (rev a1)
01:00.1 Audio device: NVIDIA Corporation Device 10ef (rev a1)
02:00.0 VGA compatible controller: NVIDIA Corporation Device 1b06 (rev a1)
02:00.1 Audio device: NVIDIA Corporation Device 10ef (rev a1)
Ensure that the NVIDIA graphic card(s) support CUDA by using nvidia-smi command. If you are using desktop, you can check against the list of desktop GPUs that I have compiled in this article: https://tech.amikelive.com/node-685/list-of-nvidia-desktop-graphics-card-models-for-building-deep-learning-ai-system/. Alternatively, you can consult with the full list of CUDA-enabled graphics cards including those for notebook and workstation at https://developer.nvidia.com/cuda-gpus.
$ nvidia-smi4. Check if the Ubuntu version is supported by CUDA toolkit.
$ uname -m && cat /etc/*releaseSample output:
x86_64
DISTRIB_ID=Ubuntu
DISTRIB_RELEASE=16.04
DISTRIB_CODENAME=xenial
DISTRIB_DESCRIPTION="Ubuntu 16.04.3 LTS"
NAME="Ubuntu"
VERSION="16.04.3 LTS (Xenial Xerus)"
ID=ubuntu
ID_LIKE=debian
PRETTY_NAME="Ubuntu 16.04.3 LTS"
VERSION_ID="16.04"
HOME_URL="http://www.ubuntu.com/"
SUPPORT_URL="http://help.ubuntu.com/"
BUG_REPORT_URL="http://bugs.launchpad.net/ubuntu/"
VERSION_CODENAME=xenial
UBUNTU_CODENAME=xenial
5. Check the GCC version currently installed
$ gcc --versionSample output:
gcc (Ubuntu 5.4.0-6ubuntu1~16.04.9) 5.4.0 20160609
Copyright (C) 2015 Free Software Foundation, Inc.
This is free software; see the source for copying conditions.  There is NO
warranty; not even for MERCHANTABILITY or FITNESS FOR A PARTICULAR PURPOSE.
6. Check the kernel version and install kernel headers
$ uname -rSample output:
4.13.0-32-genericCommand to install the kernel headers:
– By programmatically obtaining the kernel version
$ sudo apt-get install linux-headers-$(uname -r)– By explicitly typing the kernel version (you need to first check the output of “uname -r” command).
$ sudo apt-get install linux-headers-4.13.0-32-genericInstallation
After populating the system information in the pre installation steps, we can now proceed with the Cuda toolkit installation. The installation steps are as follows.
1. Download the base installer from NVIDIA download page at https://developer.nvidia.com/cuda-downloads.
To download the installer, you must have an NVIDIA Developer account. If you don’t have one, you can sign up first to create a new account.
There can be several methods that can be chosen to download the toolkit. This post only covers the installation for “deb (network)” installer. The options chosen for the installer is shown in the following image.
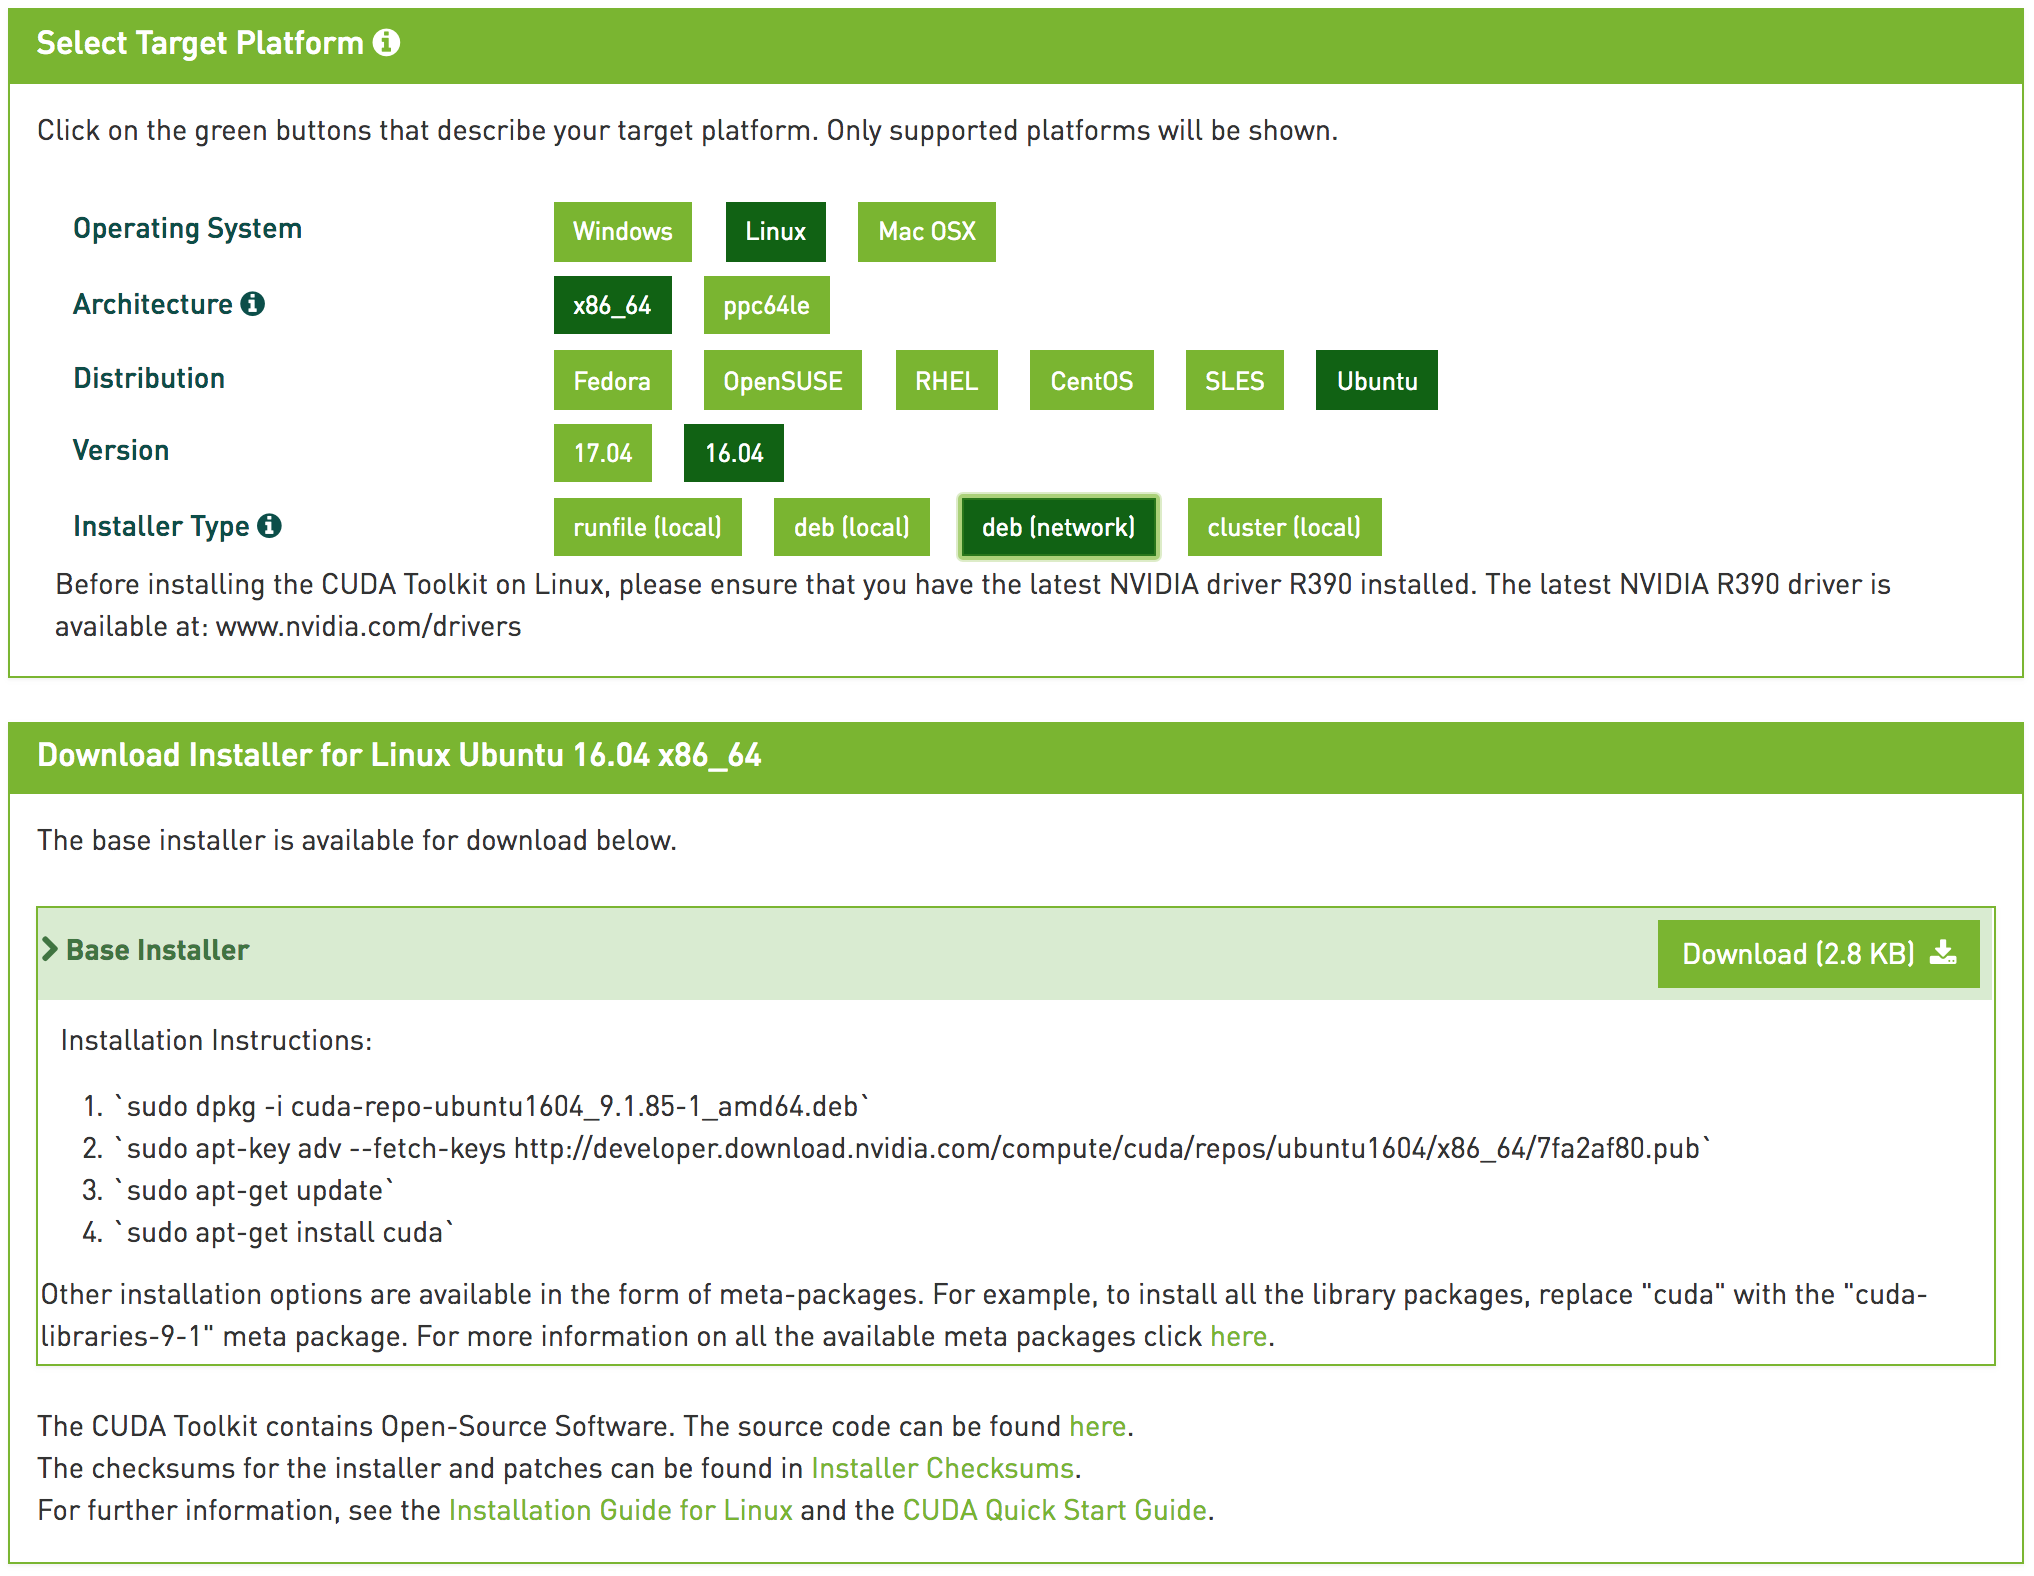
2. Use the base installer to install CUDA toolkit
The base installer contains the CUDA repository where the toolkit will be downloaded from. We simply follow the instructions provided in the “Base Installer” box to proceed.
– Install repository metadata
$ sudo dpkg -i cuda-repo-ubuntu1604_9.1.85-1_amd64.deb– Install CUDA repository GPG key
$ sudo apt-key adv --fetch-keys http://developer.download.nvidia.com/compute/cuda/repos/ubuntu1604/x86_64/7fa2af80.pub– Update the apt package index
$ sudo apt-get update– Install CUDA
$ sudo apt-get install cuda3. Add CUDA to the path so that we can directly execute CUDA binaries
$ export PATH=/usr/local/cuda-9.1/bin${PATH:+:${PATH}}To permanently add CUDA to the path, we need to modify .profile file.
$ vi ~/.profile...
PATH="/usr/local/cuda-9.1/bin:$HOME/bin:$HOME/.local/bin:$PATH"
...4. Create the NVIDIA persistence service.
Note: The persistence service will enable target GPUs to stay alive even when there is no connected clients (GPU-accelerated applications). Read more about the persistence service here.
$ cd /usr/lib/systemd/system && sudo touch nvidia-persistenced
$ sudo vi nvidia-persistenced
=========== nvidia-persistenced =============
[Unit]
Description=NVIDIA Persistence Daemon
Wants=syslog.target

[Service]
Type=forking
PIDFile=/var/run/nvidia-persistenced/nvidia-persistenced.pid
Restart=always
ExecStart=/usr/bin/nvidia-persistenced --verbose
ExecStopPost=/bin/rm -rf /var/run/nvidia-persistenced

[Install]
WantedBy=multi-user.target
5. Enable the persistence service.
$ sudo systemctl enable nvidia-persistenced6. Disable the default udev rule
Note: In some Linux distros, the default udev rule will immediately bring online hot-pluggable memory. NVIDIA driver needs to initialize the memory with non-default settings, hence the default rule should be disabled.
$ sudo vi /lib/udev/rules.d/40-vm-hotadd.rules...
#SUBSYSTEM=="memory", ACTION=="add", DEVPATH=="/devices/system/memory/memory[0-9]*", TEST=="state", ATTR{state}="online"
...7. Reboot the system
$ sudo reboot8. Verify the installation by checking the driver and toolkit version
– To check the NVIDIA driver version
$ cat /proc/driver/nvidia/versionSample output:
NVRM version: NVIDIA UNIX x86_64 Kernel Module  390.30  Wed Jan 31 22:08:49 PST 2018
GCC version:  gcc version 5.4.0 20160609 (Ubuntu 5.4.0-6ubuntu1~16.04.6)
-To check the NVIDIA CUDA toolkit version
$ nvcc --versionSample output:
nvcc: NVIDIA (R) Cuda compiler driver
Copyright (c) 2005-2017 NVIDIA Corporation
Built on Fri_Nov__3_21:07:56_CDT_2017
Cuda compilation tools, release 9.1, V9.1.85
Closing Remark
We are all done. Now you should have CUDA toolkit installed on your Ubuntu 16.04. How did you go through Cuda installation on Ubuntu 16.04? For issues, tips, troubleshooting related with Cuda toolkit installation, simply write them in the comment section.
This is the only tutorial that works for me. Ubuntu 16.04, Cuda 9.1
Good to know the guide works on your side. You can also check other deep learning system installation guide for Ubuntu 16.04 in other posts.