 In this article, you will be exposed to the installation of Sun Java in Fedora Linux. Although Java has been installed by default in every fresh Fedora package, the Java version shipped along with the OS package is the open-source version GNU Java instead. Some applications and frameworks may require Sun Java. Due to licensing issues, however, Sun Java can not be bundled with the default Fedora Linux package and should be installed separately. Although the installation steps in this article can also be reproducible in other Linux distributions, there is no guarantee that steps advised in this article will also work for other Linux distributions.
The installation of Sun Java in a Fedora Linux box can be seamlessly easy. Yet, some people especially those with minimum technical experience on *NIX OSes may face difficulties in completing the installation. This article tries to provide a comprehensive guide for the installation. It provides whole steps to be followed along with corresponding snapshots so that one can accomplish the installation successfully. It also shares some useful tips which may help readers in understanding the environment they are working on better.
Prerequisites and constraints
This installation assumes that the following requirements and constraints have been fulfilled:
1. Installation will be conducted through the console prompt.
2. User conducts the installation using root account.
3. The software yum must have been already installed in the box.
4. The software wget is already installed in the box.
Tip: if wget is not installed yet, run command yum install wget from the console and the software will be immediately installed.
5. Fedora version used is Fedora 8.0 or newer.
Note: in legacy Fedora, there is different path in installing the compatibility libraries. You can check jpackage site for more information.
6. JRE and JDK version to install is 1.6 (snapshots are for JRE and JDK 1.6 update 17)
Installation Steps
Follow the steps below carefully and in sequence so that you can complete the installation successfully. In some steps, you will also find useful information related to corresponding steps.
1.Downloading JRE and JDK package from Sun homepage.
Go to Sun download page. You will find links to download the latest JDK and JRE. Download both packages to your PC. Don’t forget to verify that the downloaded packages are not corrupted.
In the figure below, you are provided page snapshots of JRE and JDK6 update 17 for 64-bit Linux. Your choice may vary depending on your system specifications and configurations.
Note: You can choose to download either the binary or binary-rpm package. In this installation, we proceed with the binary (*.bin). However, some software applications are incompatible with the binary hence installation through the extraction of the rpm (*-rpm.bin) is preferable.
2. Installing compatibility libraries
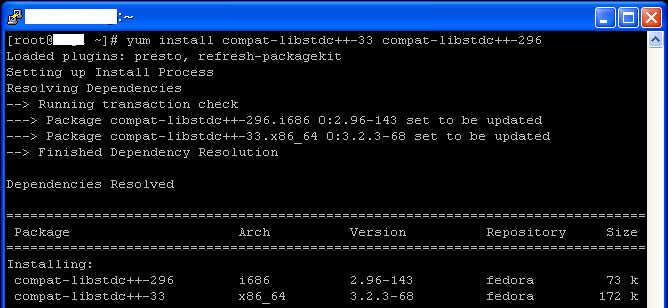
Prior to installing JRE and JDK, we should install compatibility libraries which are compat-libstdc++-33 and compat-libstdc++-96. The installation is easily accomplished via yum.
root# yum install compat-libstdc++-33 compat-libstdc++-296After the installation is complete, we should create the necessary links for the libraries. We invoke the following command on the command-line prompt:
root# /sbin/ldconfig3. Installing JDK and JRE binaries
Go to the directory where JRE and JDK were downloaded. We will start to install JRE first. To do so, add “execute” access to JRE installer and then run the installer. The installer will deflate the binaries packaged in the installer file.
root# chmod u+x jre-name-here.bin
root# ./jre-name-here.bin
After finishing the JRE installation, we proceed with JDK installation. We invoke the same commands to deflate all binaries contained in the installer file.
root# chmod u+x jdk-name-here.bin
root# ./jdk-name-here.bin
Note: during the installation of the binaries, you will be asked to agree to the SUN licensing terms, you should type yes in order to complete the installation process.
4. Moving the installed binaries to appropriate directory (/opt)
In Fedora Linux, there is a directory called /opt which is used as the parent directory for applications which are not bundled with the default OS package. This folder is similar with /usr/local in FreeBSD.
We use mv command to move the newly created JRE and JDK folder to /opt
root# mv -f jdk1.6.0_xx/ /opt
root# mv -f jre1.6.0_xx/ /opt
5. Creating a bootstrap file for Java
In this phase, we add a new file into /etc/profile.d which is named java.sh. This file will define JAVA_HOME variable and add this variable into PATH at booting time. We will use vi as the text editor.
The content of java.sh can be seen in the following snapshot:
Note:
1. Pay attention to the version. Make sure you write the right version according to the one you installed.
2. You can set JAVA_HOME to point to either JRE or JDK folder. However in latter step, you should ensure that you configure java to point to appropriate binary through alternatives command.
6. Use alternatives command to add java binaries provided by JRE and JDK into the active list.
Invoke the following command to know how many programs provide java binaries and current active selection for java binary.
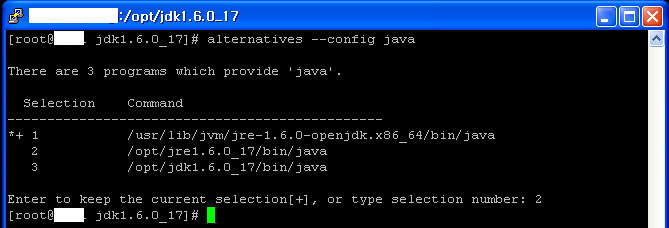
root# alternatives --config javaIn the figure, we can see that there is currently only one option for java. We will add java from JRE as option #2 and java from JDK as option #3.
root# alternatives --install /usr/bin/java java /opt/jre1.6.0_xx/java 2
root# alternatives --install /usr/bin/java java /opt/jdk1.6.0_xx/java 3
Change active selection for java to point to the one provided by either JRE or JDK. Please recheck with the value of JAVA_HOME configured in Step 5. In the following figure, we use java from JRE to serve the java binary.
Note: If you want to use java from JDK, you should change the value of JAVA_HOME in /etc/profile.d/java.sh to point to the JDK folder and then reflect the modification by changing the java option through alternatives command.
7. Run command java -version to verify that you have successfully installed and configured Sun Java on your machine.
Voila! You’re now ready to run several applications requiring Sun Java.


I am curious to find out what blog platform you have been using?
I’m experiencing some small security problems with my latest website and I would like to find something more safeguarded. Do you have any suggestions?