
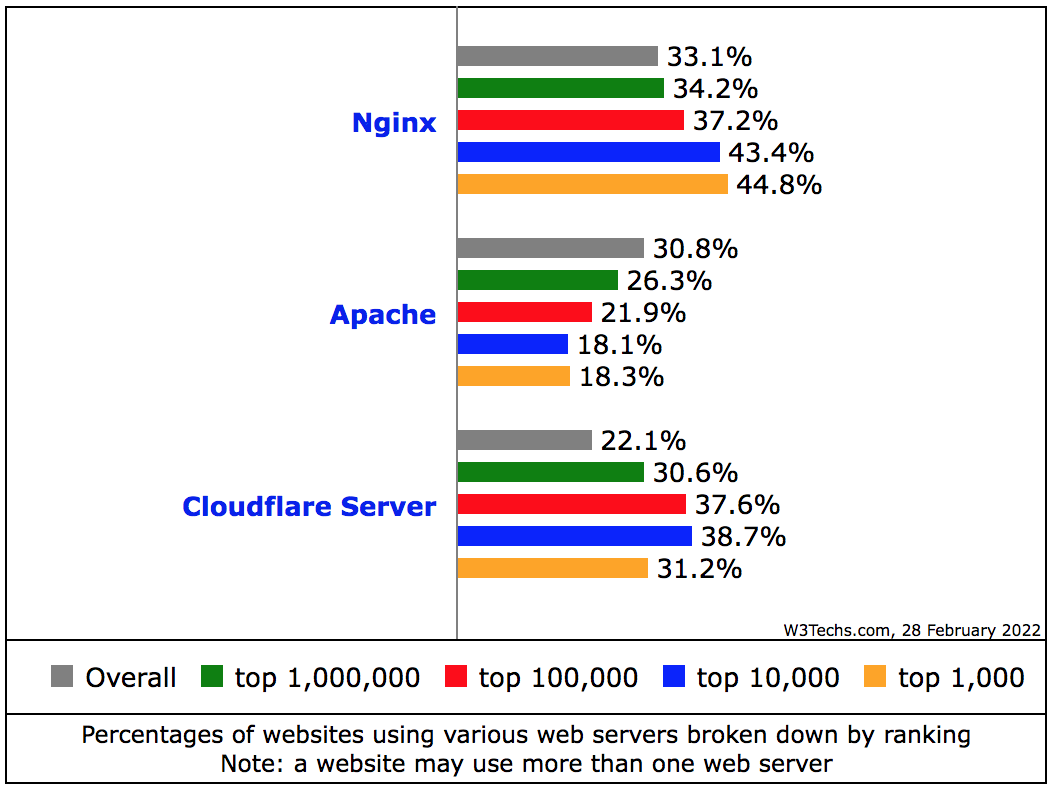
If you dabble in website/backend development, devops, or system administration, Nginx may not be a foreign name. This piece of open source software was first released in 2004 as an alternative to Apache web server. The main focus of Nginx was on performance and stability, primarily achieving a web server that could handle a lot of concurrent connections and hence addressing the C10K problem. The popularity of Nginx has been growing steadily since its initial public release. It has evolved to become a top choice in web server category. According to W3Techs, there are more than 43% of global top 10,000 websites and 44% of global top 1,000 websites running on Nginx in February 2022.
tl;dr If you are already comfortable with what Nginx can offer, you can jump to the installation part here.
Despite its original design goal, Nginx now provides more capabilities beyond web server. Based on the product information, Nginx can be installed and configured to serve various purposes that include web server, load balancer, reverse proxy, (mail) proxy server, and content cache.
a. Web server
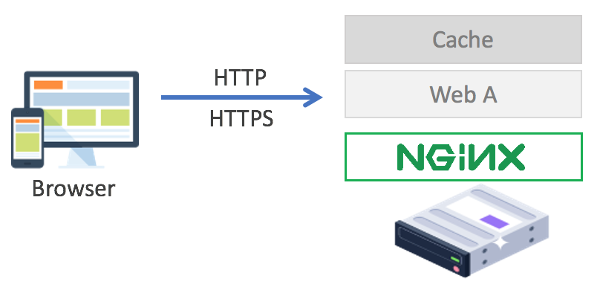
This is the original and common use of Nginx. As a web server, Nginx handles requests from clients, mostly represented by web browsers, and serves the responses returned by the websites / web applications hosted by Nginx. The communication between a client and Nginx-hosted website can be unencrypted through plain HTTP or encrypted through HTTPS.
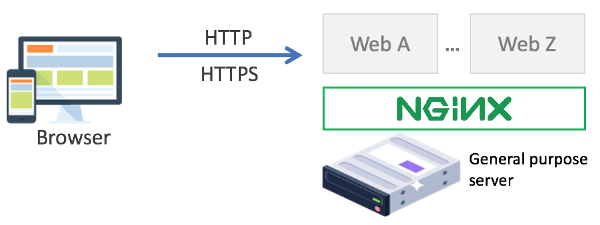
Multiple websites / web applications can be served by a single Nginx web server. Each website / web application can be assigned to a virtual host that is represented as server block in Nginx configuration. IP address/domain name and port are identifiers that are used to differentiate between one website / web application to another.
b. Load balancer
Load balancing is a technique to distribute incoming traffic to available servers so that more requests can be handled (more capacity) while aiming to maintain the desirable service quality (response time, connection stability, etc). Nginx as a load balancer distributes traffic coming from clients to a set of backend or upstream servers. The backend servers can be other Nginx instances or other types of web or application server.
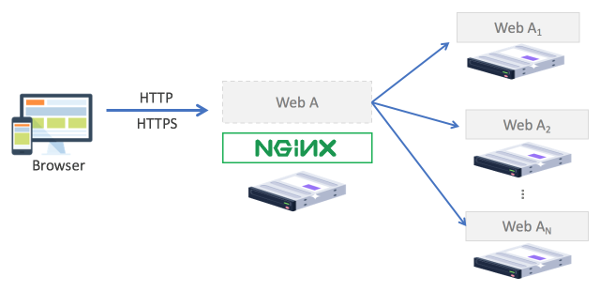
The open source version of Nginx provides four load balancing techniques: round robin, hash, IP hash, and least connections. Nginx Plus, a commercial version of Nginx adds another technique into the list, which is least time. More elaborate description about the load balancing techniques can be read here.
c. Reverse proxy
A proxy server sits between a client and a target server. It acts on behalf of the client by forwarding requests from the client to the target server, hence proxying the requests. Intuitively, a reverse proxy acts on behalf of the target server by forwarding responses from the target server to the clients, hence proxying the responses.

Reverse proxy deployment often takes place when the target backend server is isolated in a private network and disallowed access to the public network / Internet due to various reasons, as for example, to heighten security or to improve resilience and scalability.
Nginx functioning as a load balancer is the subset of Nginx functionality as a reverse proxy.
d. Proxy server
Nginx can also be set up to run as a proxy server, specifically mail proxy server. Nginx-based mail proxy server relays the requests from the mail client to the upstream mail server. Nginx handles the mailbox user authentication and acts on behalf of the mail client for sending and retrieving emails.
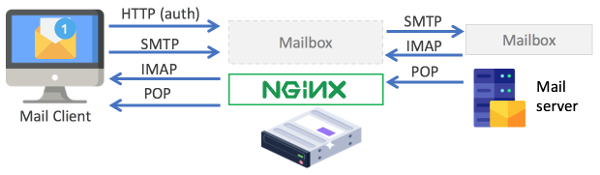
It is important to note that even though mail protocols (SMTP, IMAP, and POP) are used when sending or retrieving emails, Nginx authenticates the mail server user through HTTP-based authentication.
e. Content cache
Content caching is a mechanism to store static or dynamic content returned as responses of a request in a temporary storage (cache) so that the same request in the future can be served with the content directly from the cache. Content caching is usually combined with other type of Nginx setup, such as reverse proxy or web server. Caching the content improves the user-perceived performance especially on the latency side. When Nginx is configured as a reverse proxy, as for example, content caching improves content delivery speed since there will be less round trips made to the upstream server for proxying the same requests. Similary, when Nginx is running as a web server, there will be less time waiting for processing a request that returns dynamic content.
Nginx can perform caching at different level: URL path, single website, or globally throughout all websites / web apps served by Nginx. This flexibility helps in formulating different caching strategy for different types of content.
Installing Nginx on Ubuntu 20.04
The rest of this post focuses on Nginx installation and configuration on Ubuntu 20.04. You can add your comment if you perform the steps on different versions of Ubuntu and can still proceed successfully.
Ubuntu VM Provisioning
We will launch an Ubuntu server VM on Digital Ocean. We choose the smallest VM for the sake of having the setup as an experiment. As we fine tune the configuration, the instance may be shifting its role as a deployment environment for staging or production. You can resize the VM later if traffic outgrows what the VM can handle or compute resource upgrade becomes necessary.
To start provisioning a new Ubuntu 20.04 VM, we first login to a Digital Ocean account. After user dashboard is displayed upon successful login, we then perform these steps:
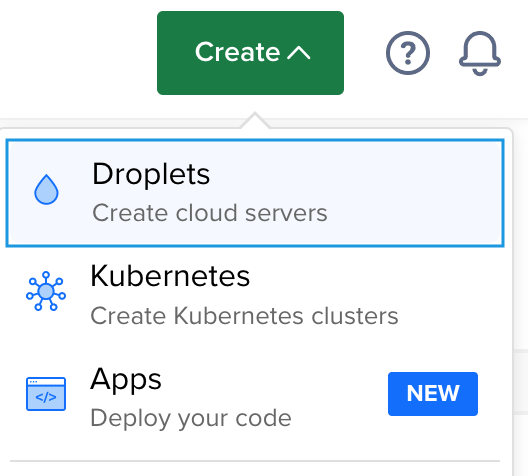
1. From top right menu, click Create > Droplets

2. In “Choose an Image” section, select Ubuntu 20.04 LTS x64 from “Distributions” tab.
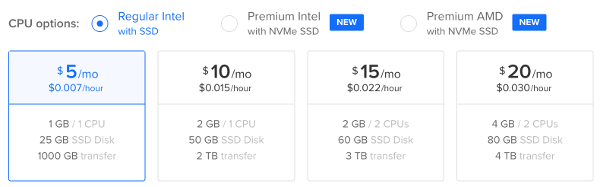
3. In “Choose a Plan” section, select Shared CPU > Basic and for the CPU options, choose “Regular Intel with SSD”
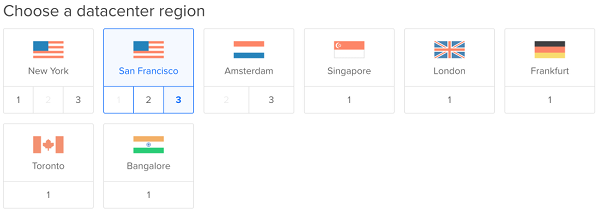
4. Choose a datacenter region from where the VM will be instantiated. You may choose a datacenter region that is closest by network distance to you or the most users/visitors in order to minimize the latency.

5. In the “Authentication” section, select authentication method. You can authenticate using your public key (SSH key) or password. Public key authentication is recommended from security point of view. If you’re on Linux or Mac, you can use ssh-keygen command line tool to generate your SSH key.
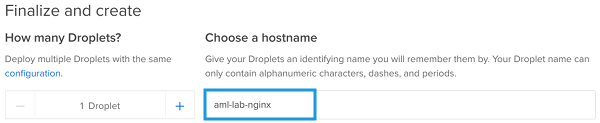
6. In the “Finalize and Create” section, assign a name for the VM. In this experiment, the name aml-lab-nginx is used.
7. Finalize the VM specs and launch the VM by pressing “Create Droplet” button.
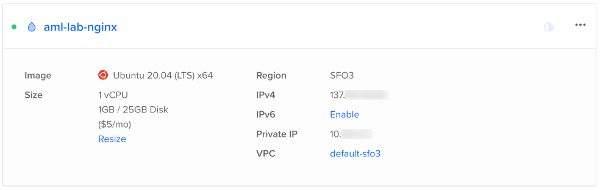
After the VM is created, you can check the details of the VM under “Resources” tab of your dashboard. For the steps provided above, the VM info displayed is provided as a reference in the picture below.
To connect to the VM using SSH, the public IP address info displayed will be use as the host name and root will be the user name as follows.
$ ssh root@{PUBLIC-IP}If SSH key was selected as the authentication method, you will need to supply the SSH key passphrase. If password authentication was chosen, you will need to type the root password.
Nginx Installation
Nginx installation is rather straightforward. Complexity may arise later in the configuration phase, especially in case of complex or high-traffic web or app deployment. If you’re just starting with Nginx, its simple installation and sufficient defaults may help improve the speed of development or testing lifecycle.
When installing on Digital Ocean, it is recommended to create a non-root user with sudo privilege to perform the installation. You can refer to this article on the relevant commands for such user creation (Step 3 in “Server Provisioning for Basic Use” section) . If you also disable root login, first ensure that you can login with the sudo-enabled user account prior to disconnecting from existing root ssh session. Another thing to note is that you need to copy your public ssh key to .ssh directory of the sudo-enabled user’s home directory when you create the VM with SSH key as the only authentication method.
After the sudo-enabled user is created, we proceed with Nginx installation as follows.
Step 1 Update apt package list
$ sudo apt packageStep 2 Install Nginx package
$ sudo apt -y install nginxStep 3 Check that Nginx service has been running
$ sudo systemctl status nginx
If you see “active” in the “Active” field like the output below, Nginx package installation has been successful and Nginx service is now properly running.
Step 4 Check the default web page is accessible
Open your browser and type http://{PUBLIC-IP}. Ensure that you can see the default Nginx web page similar to picture below.
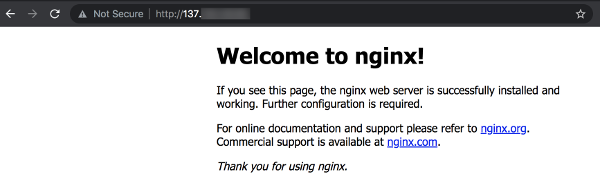
If you can see the default web page, you can conclude that the installation is complete and Nginx is properly running with default configuration.
On the contrary, if the default web page is not loaded but the Nginx service status is active, you may need to check your firewalls. First, check the hosting provider firewall that is usually configurable through GUI. Finally, check the VM firewall that is configurable through command line.
Step 5 (Optional) Configure the firewall to allow HTTP/S traffic
If you configure the VM on Digital Ocean, HTTP/S traffic is allowed by default and hence this step is not necessary. However, if you are using different provider, you may need to configure the firewall. For the VM firewall, we can use ufw, which is a built-in firewall configuration tool for Ubuntu.
– Check firewall status
$ sudo ufw statusIf you see “Status: active” in the command output but did not see any entry for HTTP/S ports, you need to configure the firewall to allow HTTP and HTTPS traffic.
– Allow HTTP/S traffic
$ sudo ufw allow proto tcp to 0.0.0.0/0 port 80
$ sudo ufw allow proto tcp to 0.0.0.0/0 port 443
We allow incoming traffic to port 80 (default HTTP) and port 443 (default HTTPS) from any IP. You can also specify certain IP addresses or subnet from which the inbound HTTP/S traffic is allowed.
The updated firewall rule will be immediately applied without restarting the firewall service. It is also recommended to rerun ufw status command in order to confirm that the new rule has been added.
$ sudo ufw status
Status: active
To                         Action      From
--                         ------      ----
22/tcp                     ALLOW       Anywhere
80/tcp                     ALLOW       Anywhere
443/tcp                    ALLOW       Anywhere
Refresh the browser and you should be able the see the default web page. If there is still no content displayed, it means your hosting provider runs another network firewall. Consult with your provider on how to configure that firewall.
Nginx Basic Configuration
A security-aware browser throws warning message “Not Secure” when displaying default Nginx page. The reason is because the web page is served through non secure HTTP port. A better way is to configure Nginx to serve the webpage through secure HTTPS port. Further Nginx configuration should be done so that the server outperforms an instance with default configuration in various aspects.
Nginx file-based configuration takes place at various scopes: service (global), feature (context), and site. In Ubuntu, global configuration is defined in /etc/nginx/nginx.conf file, feature configurations are in /etc/nginx/conf.d/ directory, and site configurations are placed inside /etc/nginx/sites-enabled/ directory that normally contains symbolic links to files in /etc/nginx/sites-available/ directory.
What happens if a configuration directive is defined several times at different scopes? It will be overridden by the same directive defined in the more specific scope. So, a configuration directive in /etc/nginx/nginx.conf can be overridden by the same directive defined in /etc/nginx/conf.d/. Furthermore, a configuration directive defined in /etc/nginx/conf.d/ can be overridden by the same directive specified in /etc/nginx/sites-enabled/. The figure below depicts the mechanism for configuration override.

By properly scoping the configuration and strategizing the mechanism for overriding configurations, we can utilize a single instance of Nginx to propel different behaviors on different websites or applications served by that Nginx instance.
Anatomy of Nginx Configuration Files
Each Nginx configuration file should follow certain structure so that it can be parsed by the runtime. There are two types of configurations in Nginx: directive and block. A directive is a single line configuration that ends with a semicolon. A block is a container for a group of directives that are enclosed by curly brackets / braces. A block is assigned a name that precedes the opening curly bracket. The block name indicates the circumstances that necessitates grouping of the enclosed directives. Hence, a block is often referred to as a context.
Let’s start with the structure of nginx.conf, the global configuration file.The structure of nginx.conf file is represented in the following picture.
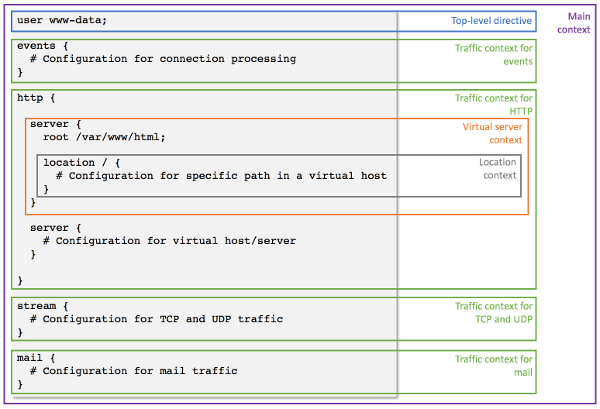
As can be seen in the picture, the whole nginx.conf file represents the main context of Nginx configuration. Above, it is mentioned that a context should be enclosed by curly brackets. The main context is an exception since it does not start with an opening bracket and closed with a closing bracket to group the top level directives and contexts
There top level contexts, which are immediate first-child contexts of nginx.conf file, correspond to traffic contexts. There are four types of these traffic contexts:
- events – context for events related to connection processing
- http – context for http traffic
- stream – context TCP and UDP traffic
- mail – context for mail traffic
For each top level context, we can define a configuration for that specific context. These context/feature specific configurations are usually placed under /etc/nginx/conf.d/ directory. As an example, directives specific to stream context is written in /etc/nginx/conf.d/stream. This config file is then included in the stream context through the include directive.
stream {
    ...
    include /etc/nginx/conf.d/stream;
}
The most important traffic context is arguably the http context. This context encloses one or multiple server blocks. A server block and hence a server context represents a virtual host that maps into a web application served by Nginx. It is not uncommon to see a server block defined as a file in /etc/nginx/sites-available/ directory with a symbolic link created in /etc/nginx/sites-enabled/ directory. The whole /etc/nginx/sites-enabled directory is then included into the http context using the include directive.
http {
    ...
    include /etc/nginx/sites-enabled/*;
}
The full list of directives that fall under each traffic context can be referenced in the official Nginx documentation (scroll to “Modules reference” section).
Basic Configuration for nginx.conf
What configuration should go at global scope in /etc/nginx/nginx.conf? There can be several answers to that. Some items that are worth mentioning:
a. Content compression
We configure Nginx to optimize content compression.We enable gzip compression and set the criteria for compression. Sample configuration is as follows.
$ sudo vi /etc/nginx/nginx.conf

http {
...
    gzip on;
    gzip_vary on;
    gzip_min_length 4096;
    gzip_proxied any;
    gzip_comp_level 5;
    gzip_types text/plain text/css application/json application/javascript text/xml application/xml application/xml+rss text/javascript;
...
}
In the above configuration, we compress text, json, and markup content with size greater than 4KB with gzip compression level set to 5.
b. Server Version
Nginx displays version and OS information in the HTTP header and error page. Example can be seen in the picture below.

We configure Nginx not to provide that information in order to put some barrier to adversaries performing server fingerprinting. We set the value of configuration directive server_tokens to off to remove the server version info.
$ sudo vi /etc/nginx/nginx.conf

http {
...
    server_tokens off;
...
}
c. SSL / TLS
Disable SSL and earlier version of TLS (TLSv1.0 and TLSv1.1). If you’re targeting modern web client, you can configure Nginx to support only TLSv1.2 and the newer TLSv1.3
$ sudo vi /etc/nginx/nginx.conf

http {
...
    ssl_protocols TLSv1.2 TLSv1.3;
    ssl_ciphers
'ECDHE-ECDSA-AES256-GCM-SHA384:ECDHE-RSA-AES256-GCM-SHA384:ECDHE-ECDSA-CHACHA20-POLY1305:ECDHE-RSA-CHACHA20-POLY1305:ECDHE-ECDSA-AES128-GCM-SHA256:ECDHE-RSA-AES128-GCM-SHA256:ECDHE-ECDSA-AES256-SHA384:ECDHE-RSA-AES256-SHA384:ECDHE-ECDSA-AES128-SHA256:ECDHE-RSA-AES128-SHA256';
    ssl_prefer_server_ciphers on;
...
}
After updating the global configuration, we test the configuration and then restart Nginx so that the new configuration can take effect.
$ sudo nginx -t
$ sudo systemctl restart nginx
Basic Configuration for a Website / Web Application
A single instance of Nginx can serve multiple websites or web applications. Each website may have its dedicated configuration file. Usually, this file is placed in /etc/sites-available directory. This configuration won’t be picked up by Nginx unless it is activated. The common way to activate the configuration is by creating a symbolic link in /etc/sites-enabled directory.
Recalling the configuration for nginx.conf, the http context encompasses a configuration directive for including all files in /etc/sites-enabled directory. This is actually the reason why we put the symbolic links to configuration files for website that we want to activate in /etc/sites-enabled directory.
Let us build our first website, assign an internet domain to it, and configure Nginx to serve the website.
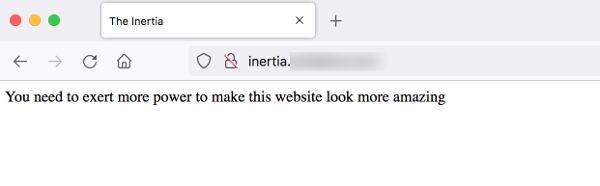
We give the website name inertia, because it basically does nothing.
Step 0 Create a (sub)domain name that resolves to the website
When viewing a website in the browser, we provide the website address in the address bar. The website address shall conform to the URL specification defined by the World Wide Web Consortium (W3C). According to the specification, a URL consists of several components with each represented as a string and joined together to form a full URL. One of the components is domain name, which can be a locally or globally assigned domain name, or an IP address (private or public).
For inertia website, we assign a subdomain name it. This assignment can be done by configuring a DNS server. An A record should be added to the main domain. If you use Digital Ocean, you perform this configuration by navigating to Networking menu, choosing a domain, and add an A record for that domain.
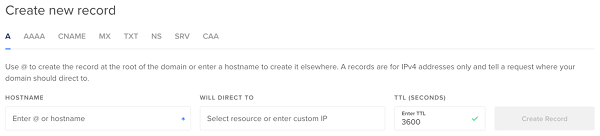
Referring to the image above, we input the desired subdomain name in HOSTNAME field. Subsequently, the IP address of the droplet that hosts the website is put into WILL DIRECT TO field.
Step 1 Copy the website code to a target directory
For a serious website / web app, it is common that it would have a directory structure that consists of multiple files adjoined to satisfy the end-to-end business logic. This time, however, we only have a banal website as a result of our procrastination. Instead of a directory, we come up with a single file.
We name the file index.html, which as the name hints, contains simple html code.
$ mkdir -p ~/inertia && cd ~/inertia
$ cat <<EOF > index.html
<html>
<head>
  <title>The Inertia</title>
</head>
<body>
  <p>You need to exert more power to make this website look more amazing</p>
</body>
</html>
EOF
The code is to be put into a target directory, which in Nginx terminology is known as the root directory of the website. The root directory can be anywhere in the file system. However, prevalent options exist as a consensus. One popular option is to copy the resources to /var/www/{WEBSITE-NAME}/html directory. Another somewhat common alternative is to copy to /usr/share/nginx/{WEBSITE-NAME} directory.
For inertia website, we put the html file to /var/www/inertia/html.
$ sudo mkdir -p /var/www/inertia/html
$ sudo cp -f ~/inertia/* /var/www/inertia/html
Next, we change the ownership of this directory. Since we copied the resource using sudo, the owner of the target directory is root. In default nginx.conf on Ubuntu, Nginx daemon runs as www-data user that has less system privileges. It is less desirable to see the website exploited in the future as an entry point of a security breach. As a basic security countermeasure, we change the ownership of the directory to www-data.
$ sudo chown -Rf www-data:www-data /var/www/inertia/htmlNow we can move on to create a configuration file for the inertia website.
Step 2 Create a configuration for the website
Website or web application with complex business logic may need advanced configuration. Since the example website is very simple, the configuration is rather straightforward.
We create a new configuration file in /etc/nginx/sites-available that is dedicated for the inertia website. We name the configuration file inertia to make it easier to recognize the website we are configuring.
$ sudo vi /etc/nginx/sites-available/inertiaThe configuration file contains a server block that maps to the domain or ip address of the inertia website. Since we already assign a domain name, we use the domain name as the website address. We write a very simple configuration for the website as follows.
server {
    listen 80;
    root /var/www/inertia/html;
    index index.html index.htm;

    server_name inertia.redacted-domain.com;

    location / {
        try_files $uri $uri/ =404;
    }
}
The configuration directives used inside the server block above are explained as follows:
listen: the port that the server will listen to. Default port 80 for HTTP is usedroot: root directory that contains the website codeindex: default file loaded when opening the websiteserver_name: the address of the website. We use the subdomain name that has been assigned to the websitelocation: a configuration block for certain matching request URItry_files: check how files should be retrieved according to the specified order
In brief, the configuration is basically to serve the inertia website on default HTTP port 80 and load index.html or index.htm file if there is no file path specified. The server will return HTTP 404 Not Found error code if the provided path is not a file or a directory.
Step 3 Apply the configuration
To apply the configuration, we create a symlink to the config file in /etc/nginx/sites-enabled directory
$ sudo ln -s /etc/nginx/sites-available/inertia /etc/nginx/sites-enabled/inertiaIt is also a good practice to remove the default Nginx landing page just to add one additional extra step to server fingerprinting.
$ sudo rm -f /etc/nginx/sites-enabled/defaultWe test the configuration once again and reload Nginx configuration.
$ sudo nginx -t
$ sudo systemctl reload nginx
Step 4 Test the access to the website
We open the browser once again and type the domain name to access the website. Voila, the simple website is now live and worldwide accessible.
What Is Next?
We have installed and configured Nginx on Ubuntu 20.04. We have also configured a simple website that is served by Nginx. It is worth noting that the website is still unsecured since all contents served through HTTP port is not encrypted. An eavesdropper in the network can see the original, plain content that is sent from the server to the client and vice versa.
In the next article, we will discuss on configuring SSL for secure connection to websites and applications that are served by Nginx.
The reason to disallow remote-root logins is so you could track which of your sysadmins logged in and used su/do to become root. I, for one, prefer that someone who wants to pwn my servers will have to figure out TWO passwords, and not just one. It was never about “first packets”. That attack was for telnet, not SSH. SSH was always properly encrypted.
Indeed, disabling remote root login helps reduce the attack surface especially when password authentication is enabled. Some servers can be misconfigured to use easy-to-bruteforce or dictionary password. A security breach with a trace of immediate root access from the adversary might be the least desirable way to start the day.
Great input, thanks for sharing!
Thanks, please keep us updated more often, your information is valuable.
Greeting sfrom Czech Republic!