 Updating packages and apps on MacOS is usually a trivial task. There are several avenues available, depending on the personal preference and degree of familiarity with various tools available on Mac. Now consider a case for updating Node.js (and subsequently npm) on MacOS. What are the options?
tl;dr Updating Node.js with lightweight package manager such as n is less error prone especially for older MacOS version
Let’s start by listing the options on our perusal.
Option 1: Download the installer from nodejs.org and install the binary
This option is ideal for the first installation. It is less ideal for update / version upgrade or if we want to maintain several nodejs versions on the machine.
Steps:
1. Go to nodejs.org homepage or the download page.
2. Choose the version to download.

Node.js versions for download
The LTS (Long Term Support) version (1) is the choice when you want to run a stable version. This is usually the preferred choice if you are developing a Node.js app to be deployed on a production server. You can also pick Current version (2) for the binary with latest / newest features.
3. Run the downloaded installer.
4. Check through command line to confirm that Node.js has been installed
$ node -vOption 2: Update Node.js through Homebrew
Homebrew is popular package management system for MacOS. It runs on command line interface to perform package or app installation/upgrade/removal through brew executable. Despite its popularity, Homebrew is not a built-in tool on Mac. It has to be installed first. Nonetheless, the Homebrew installation is very simple with one liner command on the terminal:
$ /bin/bash -c "$(curl -fsSL https://raw.githubusercontent.com/Homebrew/install/HEAD/install.sh)"Installing Node.js through Homebrew is similarly executing another simple one-line command:
$ brew install nodeIf you want to install specific version of Node.js, you need to provide the desired version in the install command. As an example, here is the command to install Node.js version 16 through Homebrew.
$ brew install node@16When newer Node.js versions are released, it is natural that the currently installed version on the machine should be updated. You can consider updating to the latest version or settling with a less recent version but with more stable binary, which is a common theme for the LTS release.
To update to the latest version of Node using Homebrew, we perform the following steps:
1. Update all package definitions (formulae)
$ brew update2. Execute the upgrade command
$ brew upgrade nodeAlternatively, to update to a specific version using Homebrew, the steps performed are somewhat different as follows:
1. Unlink from current version
$ brew unlink node2. Install the target version, for example version 16
$ brew install node@163. Link the installed version
$ brew link node@16After update is completed, we can confirm by checking the currently active version of Node.js:
$ node -vOption 3: Update Node.js using NVM
Node Version Manager or NVM is a Node.js version manager for UNIX and macOS. The tool is also not bundled into default MacOS tools so you need to install it first. Similar with Homebrew, the installation can be done by running a one-line command on the terminal:
$ curl -o- https://raw.githubusercontent.com/nvm-sh/nvm/v0.39.1/install.sh | bashor in case of using wget to fetch the installer script:
$ wget -qO- https://raw.githubusercontent.com/nvm-sh/nvm/v0.39.1/install.sh | bashNote that the above command will install NVM version 0.39.1. Check if newer version is available on the project’s Github page.
Using NVM to install Node.js is practically invoking another one-liner command, depending on the version to install:
a. Installing latest version
$ nvm install nodeb. Installing specific version (e.g. 16.13.2)
$ nvm install 16.13.2NVM allows installation of different versions of Node.js. This means that you can run the install command several times with different version parameters. To check the list of Node.js versions that have been installed on the machine, we use nvm ls command as follows:
$ nvm lsSample output when (a) and (b) commands above were executed in sequence:
->     v16.13.2
        v17.4.0
default -> node (-> v17.4.0)
iojs -> N/A (default)
unstable -> N/A (default)
node -> stable (-> v17.4.0) (default)
stable -> 17.4 (-> v17.4.0) (default)
lts/* -> lts/gallium (-> v16.13.2)
lts/argon -> v4.9.1 (-> N/A)
lts/boron -> v6.17.1 (-> N/A)
lts/carbon -> v8.17.0 (-> N/A)
lts/dubnium -> v10.24.1 (-> N/A)
lts/erbium -> v12.22.9 (-> N/A)
lts/fermium -> v14.18.3 (-> N/A)
lts/gallium -> v16.13.2
As can be seen in the output, Node.js v17.4 and v16.13 have been installed. The first version installed was v17.4, which was the default, followed by v16.13 as a version selected by the user. The active version is v16.13 as indicated by the arrow.
To switch to another version from the list, we use nvm use command. Let’s say we want to switch back to v17.4. We run this command to perform the switch.
$ nvm use 17.4.0When using NVM, updating Node.js version is the analogous to installing a newer version, either the latest or user-supplied one, through nvm install command, and subsequently tell NVM to switch to that version by running the nvm use command.
To get the list of Node.js versions available for install by NVM, we use this command.
$ nvm ls-remoteHere is sample command output as a reference.
       ...
       v16.12.0
       v16.13.0   (LTS: Gallium)
       v16.13.1   (LTS: Gallium)
       v16.13.2  (Latest LTS: Gallium)
        v17.0.0
        v17.0.1
        v17.1.0
        v17.2.0
        v17.3.0
        v17.3.1
->      v17.4.0
The active version is again indicated by the arrow on the left. If a newer version has been included in the list, the update can be performed. Let’s say we want to update to version v17.5.0. Commands to be run are as follows:
$ nvm install 17.5.0
$ nvm use 17.5.0
Option 4: Update Node.js using n package manager
With only a single letter as a name for Node.js package manager, n might try to aim for simplicity. The unassuming name saves a few keystrokes, too. A common way to install the n package manager is through npm. This means that Node.js should have been installed first on the machine prior to installing the n package manager.
We install n through npm as follows:
$ npm install -g nThe above command will install n for all users. Additionally, you may need to use sudo to proceed with the installation, depending on how the current Node.js was installed.
$ sudo npm install -g nUpdating Node.js with n involves very minimalistic command
$ n <version>Let’s consider several update scenarios to reflect how the command is used.
a. Updating Node.js to the latest LTS version
$ n ltsb. Updating Node.js to the latest Node.js version
$ n latestc. Interactive update by choosing from available version
$ nd. Updating Node.js to a specific version, for example 17.4.0
$ n 17.4.0Option 5: Update Node.js through MacPorts
MacPorts Project is an open-source community-driven project that provides the MacPorts software tracker / manager for distributing numerous software titles (ports) on macOS. Since it is a community-driven initiative, MacPorts is not bundled into default macOS apps and tools. A common way to install is through the package installers available at the project’s download page.
When using MacPorts, we install Node.js with the following command:
$ sudo port install <nodejs_port_name>Node.js port names can be found by searching on MacPorts website or querying through MacPorts command line interface as follows:
$ port search --name --line --regex '^nodejs\d*$'Let’s say we want to install Node.js version 16. The command we run now becomes:
$ sudo port install nodejs16To update Node.js, we first sync MacPorts local repository with global MacPorts ports repository and run update command as follows:
$ sudo port selfupdate && sudo port upgrade nodejs16Note that the above update command will only update the minor versions. If you want to update to another major version, let’s say from Node.js v16 to Node.js v17, we alter the command as can be seen below.
$ sudo port selfupdate
$ sudo port deactivate nodejs16 @{active_version}
$ sudo port install nodejs17
The Node.js active version @{active_version} can be found by running the command to display the version of Node.js installed by MacPorts.
$ port installed nodejs16Updating Node.js on an Old Mac
With various options for updating Node.js, it will be interesting to see if certain option is more effective and less error prone. Let us consider a fringe update scenario, which is updating Node.js on an old Mac.

A machine with older version of MacOS (High Sierra)
As can be seen in the picture above, the target machine is a Macbook Pro with MacOS High Sierra (v10.13.6) installed. Despite the software age, the hardware specs are still capable of squeezing some productivity juice.
The machine already has Node.js installed, albeit a somewhat archaic version.
$ node -v
v12.12.0

$ npm -v
6.14.15
We will update Node.js to the latest version at the time this article is written, which is version 16 for the LTS version. The version upgrade path is visualized in the following diagram.

Node.js and NPM update path
As can be seen in the diagram, we will perform update by skipping some versions. For Node.js, we will skip version 13, 14, and 15 altogether. We will also need to update npm to version 8, the minimum version required by Node.js version 16. The Node.js website provides the compatibility list for Node.js and npm. A sample snapshot can be seen below.
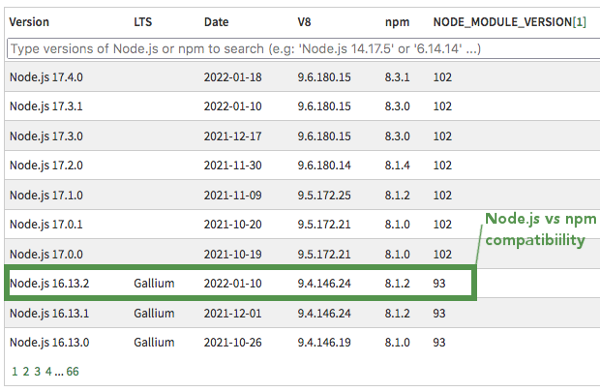
Node.js vs npm compatibility
For the update process, we pick two options: Homebrew, which represents a full-fledged package manager and n that represents a special-purpose package manager.
Updating with Homebrew
The update are performed in two stages: Homebrew update and Node.js update.
For the first stage, we run this command to update Homebrew package definitions
$ brew updateAfter brew is updated, we verify that the currently installed version has been outdated and hence needs update.
$ brew outdated
...
libwebsockets (2.4.2_1) < 4.3.1
mosquitto (1.4.14_2) < 2.0.14
node (12.12.0) < 17.4.0
numpy (1.14.2) < 1.22.1
openexr (2.2.0) < 3.1.4
...
Homebrew reports that Node.js version is outdated and should be updated to version 17.4.0. Our initial plan is to update to version 16, a less recent version compared to the default update. But let us check first if the general update for Node.js works.
$ brew upgrade nodeWe expect that this will go through smoothly. Interestingly, prior to updating Node.js, Homebrew checks and installs the update to Node.js dependencies as shown in the following sample output log.
Warning: You are using macOS 10.13.
We (and Apple) do not provide support for this old version.
You will encounter build failures with some formulae.
Please create pull requests instead of asking for help on Homebrew's GitHub,
Twitter or any other official channels. You are responsible for resolving
any issues you experience while you are running this
old version.
==> Upgrading 1 outdated package:
node 12.12.0 -> 17.4.0
...
==> Installing node dependency: llvm
==> Installing dependencies for llvm: cmake, openssl@1.1, readline, sqlite and python@3.10
==> Installing llvm dependency: cmake
...
==> Installing llvm
==> cmake -G Unix Makefiles .. -DLLVM_ENABLE_PROJECTS=clang;clang-tools-extra;lld;lldb;mlir;polly -DLLVM_ENABLE_RUNTIMES=compiler-rt;libcxx;libcxxabi;libunwind;openmp -DLLVM_POLLY_LINK_INTO_TOOLS=ON -DLLV
==> cmake --build .
...
[ 81%] Built target lldMachO
make: *** [all] Error 2
Do not report this issue to Homebrew/brew or Homebrew/core!
These open issues may also help:
llvm: delete duplicate files in xcode toolchain https://github.com/Homebrew/homebrew-core/pull/87483
llvm, halide, lit: migrate to Python 3.10 https://github.com/Homebrew/homebrew-core/pull/89262
Error: You are using macOS 10.13.
We (and Apple) do not provide support for this old version.
You will encounter build failures with some formulae.
Please create pull requests instead of asking for help on Homebrew's GitHub,
Twitter or any other official channels. You are responsible for resolving
any issues you experience while you are running this
old version.
In Homebrew, llvm is a dependency for node package. Homebrew updates llvm by installing from sources. However, the sources failed to build. Homebrew also warns that recent version of llvm does not support macOS 10.13. This prevents us from completing the update process for Node.js.
Result: Failed to update Node.js
Updating with n package manager
We run this command to update Node.js to its LTS version
$ sudo n ltsThe one-line command works with such a breeze.
    install : node-v16.13.2
      mkdir : /usr/local/n/versions/node/16.13.2
      fetch : https://nodejs.org/dist/v16.13.2/node-v16.13.2-darwin-x64.tar.gz
######################################################################## 100.0%
   installed : v16.13.2
This is confirmed by checking the active version after update.
$ node -v
v16.13.2
However, the package manager does not update npm. If we rerun the command to check npm version, error is shown since the updated Node.js binary has become incompatible with the old npm version.
$ npm -v
TypeError: Class extends value undefined is not a constructor or null
    at Object.<anonymous> (/usr/local/lib/node_modules/npm/node_modules/socks-proxy-agent/dist/agent.js:114:44)
    at Module._compile (node:internal/modules/cjs/loader:1101:14)
    at Object.Module._extensions..js (node:internal/modules/cjs/loader:1153:10)
    at Module.load (node:internal/modules/cjs/loader:981:32)
    at Function.Module._load (node:internal/modules/cjs/loader:822:12)
    at Module.require (node:internal/modules/cjs/loader:1005:19)
    at require (node:internal/modules/cjs/helpers:102:18)
    at Object.<anonymous> (/usr/local/lib/node_modules/npm/node_modules/socks-proxy-agent/dist/index.js:5:33)
    at Module._compile (node:internal/modules/cjs/loader:1101:14)
    at Object.Module._extensions..js (node:internal/modules/cjs/loader:1153:10)
    at Module.load (node:internal/modules/cjs/loader:981:32)
    at Function.Module._load (node:internal/modules/cjs/loader:822:12)
    at Module.require (node:internal/modules/cjs/loader:1005:19)
    at require (node:internal/modules/cjs/helpers:102:18)
    at Object.<anonymous> (/usr/local/lib/node_modules/npm/node_modules/make-fetch-happen/lib/agent.js:161:25)
    at Module._compile (node:internal/modules/cjs/loader:1101:14)
As a remedy to this problem, we perform manual update for npm
$ sudo npm install -g npmAs npm is updated, the previous error disappears and we can subsequently update npm packages. We can confirm this by rerunning the npm version check command.
$ npm -v
8.4.0
Result: Node.js updated successfully
Conclusion
Even though there are several options to update Node.js, not all options immediately work. When considering an update on old Mac, lightweight or special purpose package manager such as n package manager has higher success rate for performing the package update. This may also be true for NVM even though further testing is required.
Pingback: Updating Nodejs on mac