If you dabble in website/backend development, devops, or system administration, Nginx may not be a foreign name. This piece of open source software was first released in 2004 as an alternative to Apache web server. The main focus of Nginx was on performance and stability, primarily achieving a web server that could handle a lot of concurrent connections and hence addressing the C10K problem. The popularity of Nginx has been growing steadily since its initial public release. It has evolved to become a top choice in web server category. According to W3Techs, there are more than 43% of global top 10,000 websites and 44% of global top 1,000 websites running on Nginx in February 2022.
Continue readingCategory Archives: Linux
How to Configure and Use Passwordless SSH for Infrastructure Automation on Ubuntu
In the previous post, we revisited SSH public key authentication protocol that brought passwordless SSH to life. We perused and summarized the RFCs. To visualize the authentication process, we drew the arrows that highlight the sequences of messages exchanged between the client and the server.
Not to get overwhelmed with theories, we set up a mini lab to demonstrate how a client should authenticate itself against a remote server with passwordless SSH. We ran the experiment in a cloud environment provided by Digital Ocean.
And probably you may ask this question, “Why running the experiment in the cloud?”
The very simple answer to this is “to emulate the situations when passwordless SSH shines”.
Let’s go into more details by reviewing the use cases.
Passwordless SSH Concept and How to Setup on Ubuntu

Secure Shell (SSH) as defined in RFC4251 is a protocol for secure remote login and other secure network services over an insecure network. SSH consists of three main components: transport layer protocol, user authentication protocol and the connection protocol.
The transport protocol for SSH 2.0 as elaborated in RFC4253 provides a secured channel over an insecure network by performing host authentication, key exchange, encryption and integrity protection, and also deriving unique session ID that can be used by higher-level protocols.
The authentication protocol as elaborated in RFC4252 provides a suite of mechanisms that can be used to authenticate the client user to the server. There are three authentication mechanisms for SSH: public key authentication, password authentication, and host-based authentication.
The connection protocol as elaborated in RFC4254 specifies a mechanism to multiplex multiple data channels into a single encrypted tunnel over the secured and authenticated transport. The channels can be used for various purposes such as interactive shell sessions, remote command executions, forwarding arbitrary TCP/IP ports/connections over the secure transport, forwarding X11 connections, and accessing the secure subsystems on the server host.
CUDA Compatibility of NVIDIA Display / GPU Drivers
Last update: December 2nd, 2023
The last post about CUDA installation guide was for CUDA 9.2. We went through several types of CUDA installation methods, including the multiple-version CUDA installs. While the guide is still valid for CUDA 9.2, NVIDIA keeps releasing newer versions of CUDA. As a concrete example, when this article was first written in December 2018, the latest CUDA version was CUDA 10, taking the spotlight from CUDA 9.2. If we are about to upgrade to CUDA 10, how can we achieve so? Can we simply upgrade the CUDA toolkit without upgrading the display driver?
Handling CUDA Version Upgrade
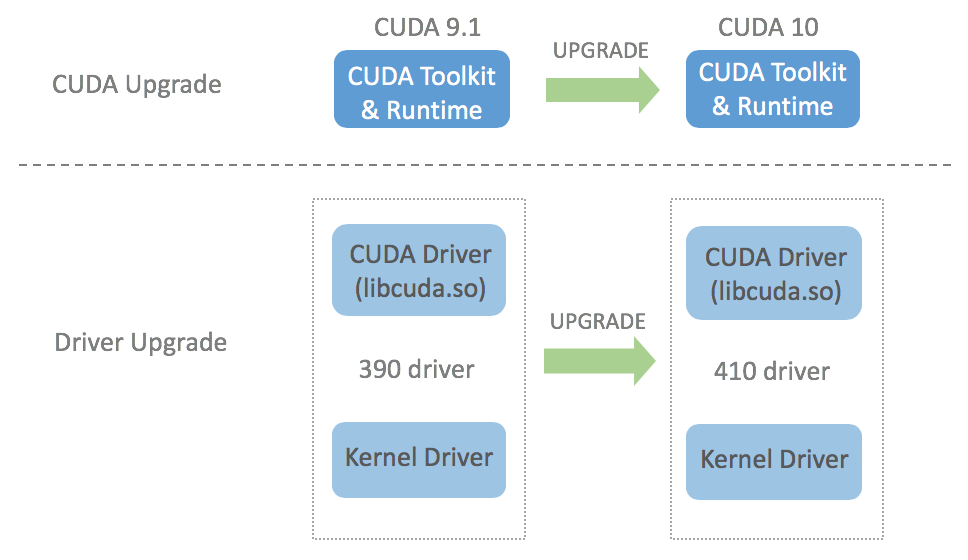
CUDA version upgrade itself can be a misleading term because since CUDA 8.0, multiple versions of CUDA can be installed on the same machine. But let’s have a simple scenario where we already have CUDA 9.1 installed and only want to upgrade to CUDA 10. NVIDIA states that each version of CUDA toolkit requires certain minimum NVIDIA display version that should be satisfied. This means that when upgrading to newer version of CUDA toolkit, we need to make sure that the currently installed display driver version is newer/bigger than the minimum compatible display driver version. In other words, standard CUDA upgrade involves two upgrade processes: CUDA (toolkit) upgrade and driver upgrade. The following picture visualizes the standard upgrade process from CUDA 9.1 to CUDA 10: the toolkit is upgraded from 9.1 to 10 and the driver is upgraded from 390 to 410.

How to Resolve The Error “Illegal instruction (core dumped)” when Running “import tensorflow” in a Python Program
There are several ways to install TensorFlow on Ubuntu. The easiest way is to install via pip. Unfortunately, this easy installation may result in a bumpy first time experience of running TensorFlow. Consider the following one line Python script:
$ python -c 'import tensorflow as tf;'This should be where the excitement begins, the moment where conviction about the new era of AI-powered banalities starts to bloom. Yet, the reality can be unexpectedly different. Executing the command may immediately raise this very infamous error:
Illegal instruction (core dumped)This means that TensorFlow has crashed even before it does anything. What a surprise!
The good thing is that we can run gdb to debug Python and start analyzing the call stack. But what’s even better is that we can save the brilliance for later. This error has been repeatedly reported and has conveniently sat on its fame for a while, as reflected on the issue page.


