 In the previous post, we’ve proceeded with CUDA 9.1 installation on Ubuntu 16.04 LTS. As with other software that evolves, NVIDIA released CUDA 9.2 back in May. It is also safe to assume that CUDA 9.2 will not be final version. Newer version will may come soon or later and here we are left with the bogging question: “How can we upgrade safely without clobbering the currently working system?” Moreover, we may also wonder if there is a mechanism to rollback the change and live with current setup while recognizing that it’s not yet the time to upgrade.
This post will cover three scenarios of CUDA 9.2 installation: 1) fresh installation, 2) install to upgrade by removing old version, 3) install to upgrade and keep multiple versions.
Pre-Installation Checks
Before we proceed with the installation, we need to check and confirm the current state of installed software components by running a series of commands as outlined below.
Tip: The commands shown in this section are taken from the command cheatsheet written in this article.
1. Check the NVIDIA graphics driver that is currently installed.
We run this command to get the graphics driver version:
$ nvidia-smi | grep "Driver Version" | awk '{print $6}'If you see the error message “bash: nvidia-smi: command not found”, it means that the graphics driver has not been installed. You can refer to this article for NVIDIA graphics driver installation.
2. Check if there is existing CUDA installed
We run this command to get the installed CUDA version:
$ nvcc --version | grep "release" | awk '{print $6}' | cut -c2-If you see the error message “bash: nvcc: command not found”, it implies that CUDA has not been installed or previous installation was not successful.
3. Check if there is existing CUDA profiling tools installed
We run this command to get the installed CUDA profiling tools version:
$ locate cupti | grep "libcupti.so." | tail -n1 | sed -r 's/^.*\.so\.//'Empty result means that the CUDA profiling tools library has not been installed.
Note: if you see the error message “bash: locate: command not found”, you may need to first install mlocate package. Use this command to install the package:
$ sudo apt-get install mlocateAlternatively, we can substitute locate command with find command as follows:
$ find /usr -name "*libcupti.so.*" | head -n1 | sed -r 's/^.*\.so\.//'4. Check if there is existing cuDNN library installed
We run this command the get the currently installed cuDNN library
$ locate cudnn | grep "libcudnn.so." | tail -n1 | sed -r 's/^.*\.so\.//'Alternative command:
$ find /usr -name "*libcudnn.so.*" | head -n1 | sed -r 's/^.*\.so\.//'If you get empty result, it can be concluded the cuDNN library is not present on the system.
5. Check NVIDIA and CUDA packages installed by the package manager
To double check the install statuses of NVIDIA and CUDA packages in the system, we run the following command and observe the result
– Checking install statuses of NVIDIA packages
$ dpkg -l | grep nvidiaSample output:
...
rc  nvidia-384                384.111-0ubuntu0.16.04.1    amd64    NVIDIA binary driver - version 384.111
ii  nvidia-390                390.30-0ubuntu1             amd64    NVIDIA binary driver - version 390.30
ii  nvidia-390-dev            390.30-0ubuntu1             amd64    NVIDIA binary Xorg driver development files
rc  nvidia-opencl-icd-384     384.111-0ubuntu0.16.04.1    amd64    NVIDIA OpenCL ICD
ii  nvidia-opencl-icd-390     390.30-0ubuntu1             amd64    NVIDIA OpenCL ICD
...
Interpretation of the output:
The install status of a package is displayed as the value of the first column. It can consist of three letters:
- The first letter: the expected / desired status of the package
- The second letter: the current status of the package
- The third letter: the error status of the package
What are the available states for expected, current, and error statuses? We can find them by tweaking how we parse dpkg command output:
$ dpkg -l | head -n3...
Desired=Unknown/Install/Remove/Purge/Hold
| Status=Not/Inst/Conf-files/Unpacked/halF-conf/Half-inst/trig-aWait/Trig-pend
|/ Err?=(none)/Reinst-required (Status,Err: uppercase=bad)
...Interpretation of the output:
From the output, we have two combinations of values: “rc” and “ii”. The value “rc” means that the package should be or should have been removed and only configuration files remain in the system without any error noticed. Alternatively, the value “ii” means that the package should be or should have been installed and is currently installed properly without error. Further examining the first and second rows, it can be seen that the currently active NVIDIA graphics driver is version 390.30. This driver replaces the older version 384.111 that has also been removed from the system.
– Checking install statuses of CUDA packages
$ dpkg -l | grep cudaSample output:
...
ii  cuda                            9.1.85-1            amd64        CUDA meta-package
ii  cuda-9-1                        9.1.85-1            amd64        CUDA 9.1 meta-package
ii  cuda-command-line-tools-9-1     9.1.85-1            amd64        CUDA command-line tools
ii  cuda-compiler-9-1               9.1.85-1            amd64        CUDA compiler
ii  cuda-cublas-9-1                 9.1.85.3-1          amd64        CUBLAS native runtime libraries
ii  cuda-cublas-dev-9-1             9.1.85.3-1          amd64        CUBLAS native dev links, headers
ii  cuda-cudart-9-1                 9.1.85-1            amd64        CUDA Runtime native Libraries
ii  cuda-cudart-dev-9-1             9.1.85-1            amd64        CUDA Runtime native dev links, headers
ii  cuda-cufft-9-1                  9.1.85-1            amd64        CUFFT native runtime libraries
ii  cuda-cufft-dev-9-1              9.1.85-1            amd64        CUFFT native dev links, headers
ii  cuda-cuobjdump-9-1              9.1.85-1            amd64        CUDA cuobjdump
ii  cuda-cupti-9-1                  9.1.85-1            amd64        CUDA profiling tools interface.
ii  cuda-curand-9-1                 9.1.85-1            amd64        CURAND native runtime libraries
ii  cuda-curand-dev-9-1             9.1.85-1            amd64        CURAND native dev links, headers
ii  cuda-cusolver-9-1               9.1.85-1            amd64        CUDA solver native runtime libraries
ii  cuda-cusolver-dev-9-1           9.1.85-1            amd64        CUDA solver native dev links, headers
ii  cuda-cusparse-9-1               9.1.85-1            amd64        CUSPARSE native runtime libraries
ii  cuda-cusparse-dev-9-1           9.1.85-1            amd64        CUSPARSE native dev links, headers
ii  cuda-demo-suite-9-1             9.1.85-1            amd64        Demo suite for CUDA
ii  cuda-documentation-9-1          9.1.85-1            amd64        CUDA documentation
ii  cuda-driver-dev-9-1             9.1.85-1            amd64        CUDA Driver native dev stub library
ii  cuda-drivers                    390.30-1            amd64        CUDA Driver meta-package
ii  cuda-gdb-9-1                    9.1.85-1            amd64        CUDA-GDB
ii  cuda-gpu-library-advisor-9-1    9.1.85-1            amd64        CUDA GPU Library Advisor.
ii  cuda-libraries-9-1              9.1.85-1            amd64        CUDA Libraries 9.1 meta-package
ii  cuda-libraries-dev-9-1          9.1.85-1            amd64        CUDA Libraries 9.1 development meta-package
ii  cuda-license-9-1                9.1.85-1            amd64        CUDA licenses
ii  cuda-memcheck-9-1               9.1.85-1            amd64        CUDA-MEMCHECK
ii  cuda-misc-headers-9-1           9.1.85-1            amd64        CUDA miscellaneous headers
ii  cuda-npp-9-1                    9.1.85-1            amd64        NPP native runtime libraries
ii  cuda-npp-dev-9-1                9.1.85-1            amd64        NPP native dev links, headers
ii  cuda-nsight-9-1                 9.1.85-1            amd64        CUDA nsight
ii  cuda-nvcc-9-1                   9.1.85.2-1          amd64        CUDA nvcc
ii  cuda-nvdisasm-9-1               9.1.85-1            amd64        CUDA disassembler
ii  cuda-nvgraph-9-1                9.1.85-1            amd64        NVGRAPH native runtime libraries
ii  cuda-nvgraph-dev-9-1            9.1.85-1            amd64        NVGRAPH native dev links, headers
ii  cuda-nvml-dev-9-1               9.1.85-1            amd64        NVML native dev links, headers
ii  cuda-nvprof-9-1                 9.1.85-1            amd64        CUDA Profiler tools
ii  cuda-nvprune-9-1                9.1.85-1            amd64        CUDA nvprune
ii  cuda-nvrtc-9-1                  9.1.85-1            amd64        NVRTC native runtime libraries
ii  cuda-nvrtc-dev-9-1              9.1.85-1            amd64        NVRTC native dev links, headers
ii  cuda-nvtx-9-1                   9.1.85-1            amd64        NVIDIA Tools Extension
ii  cuda-nvvp-9-1                   9.1.85-1            amd64        CUDA nvvp
ii  cuda-repo-ubuntu1604            9.2.148-1           amd64        cuda repository configuration files
ii  cuda-runtime-9-1                9.1.85-1            amd64        CUDA Runtime 9.1 meta-package
ii  cuda-samples-9-1                9.1.85-1            amd64        CUDA example applications
ii  cuda-toolkit-9-1                9.1.85-1            amd64        CUDA Toolkit 9.1 meta-package
ii  cuda-tools-9-1                  9.1.85-1            amd64        CUDA Tools meta-package
ii  cuda-visual-tools-9-1           9.1.85-1            amd64        CUDA visual tools
ii  libcuda1-390                    390.30-0ubuntu1     amd64        NVIDIA CUDA runtime library
ii  libcudnn7                       7.1.2.21-1+cuda9.1  amd64        cuDNN runtime libraries
ii  libcudnn7-dev                   7.1.2.21-1+cuda9.1  amd64        cuDNN development libraries and headers
...
Interpretation of the output:
The system currently has CUDA 9.1 installed. Additionally, cuDNN library version 7.1 is also installed. Installing CUDA 9.2 in the system simply means upgrading from or replacing the previous version, unless both are configured to be in active use.
6. Build the system summary table for CUDA 9.2 installation
After performing pre-installation step 1 to 5, we build a simple table to summarize the current state of the system.
| No | Component | Installed Version |
|---|---|---|
| 1 | Graphics Driver | TO BE FILLED |
| 2 | CUDA (via locate) | TO BE FILLED |
| 3 | CUDA (via dpkg) | TO BE FILLED |
| 4 | CUDA profiling tools | TO BE FILLED |
| 5 | cuDNN (via locate) | TO BE FILLED |
| 6 | cuDNN (via dpkg) | TO BE FILLED |
Based on the values we inputted to the table, we may use the following rule for CUDA 9.2 installation:
- No graphics driver and/or CUDA installed: Install the graphics driver first, follow with CUDA 9.2 fresh install
- Graphics driver version < 396.x and CUDA version < 9.2: Update the graphics driver first, follow with CUDA 9.2 upgrade install
- Graphics driver version >= 396.x and CUDA version < 9.2: Upgrade installation to CUDA 9.2
- cuDNN < 7.x and CUDA version < 9.2: Upgrade installation to CUDA 9.2 followed with cuDNN upgrade
- cuDNN >= 7.x and CUDA version >= 9.2: Thanks for reading even though you already have everything set up
Installation Preparation: CUDA 9.2 Package Download
For all the installation scenarios, we need to download CUDA 9.2 packages from NVIDIA developer website. The steps to download are as follows:
1. Go to the CUDA download page: https://developer.nvidia.com/cuda-downloads
2. Select the target platform and installer type. We will choose “deb (network)” for the installer type since it is the installer type that has been consistently working and is easier to work with for an upgrade.
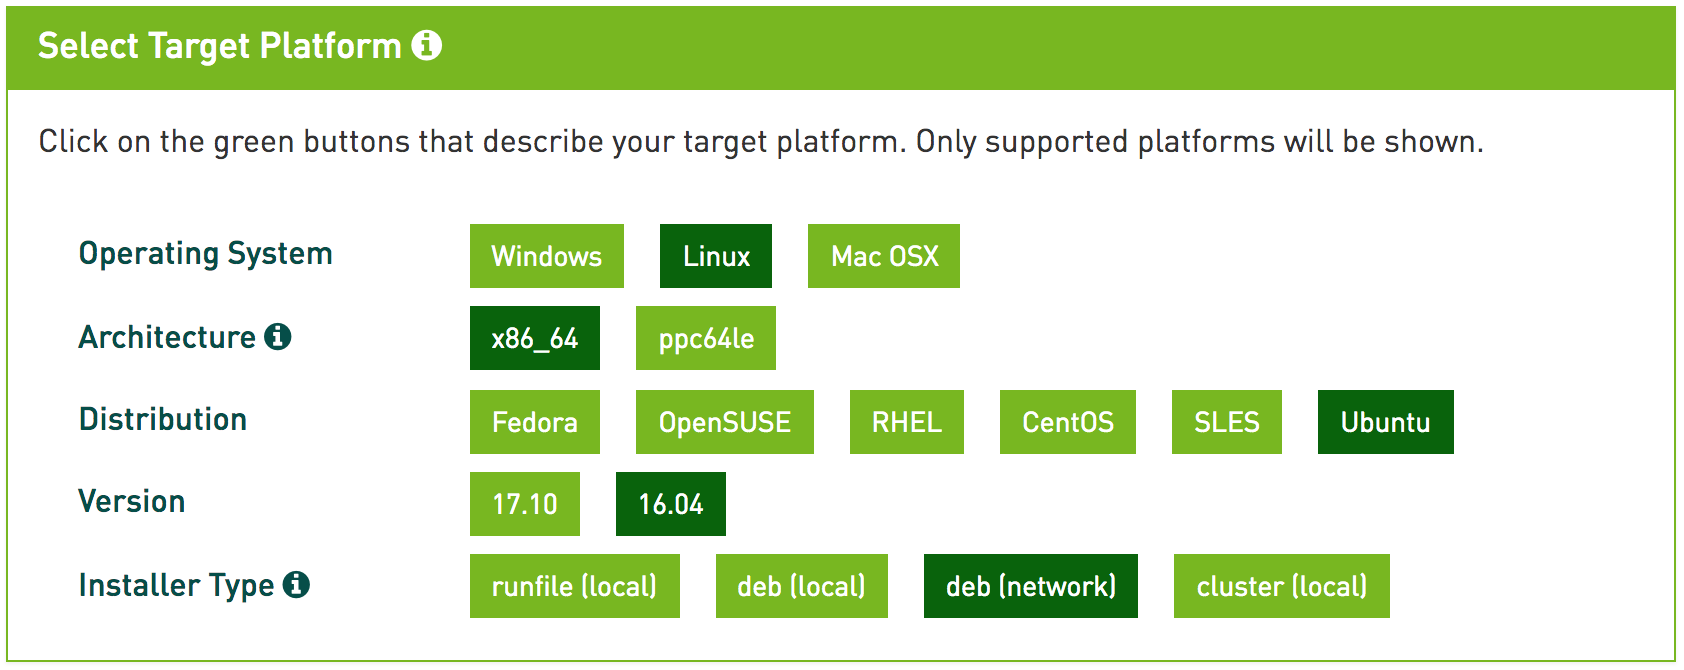
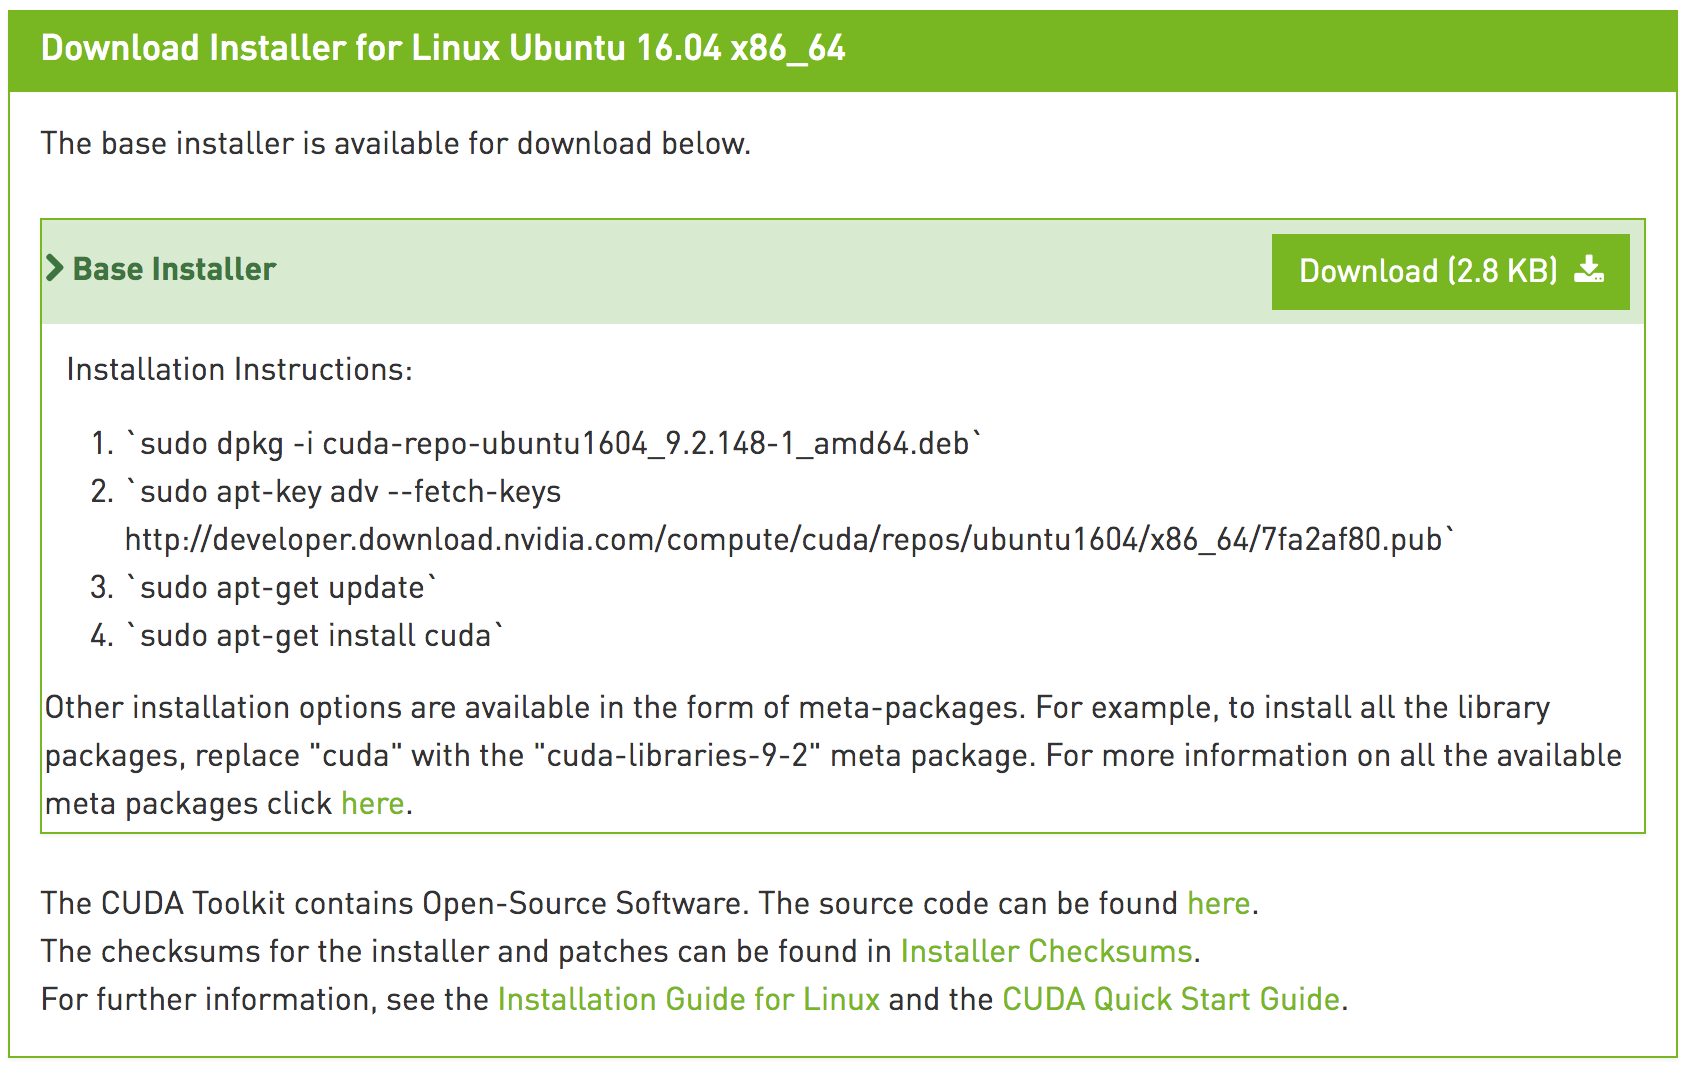
3. Download the installer. Refrain from immediately executing the commands displayed in the installation instruction box. We will run different commands for different installation scenario.
Depending on the website policy, you may or may not need to login to download the installer. In the past, installer download required login. However, at the time this post is written, login is not required for downloading the packages.
Fresh Installation
After downloading CUDA 9.2 package, we now proceed with the installation. For a fresh install, we go through the remaining steps of the installation as follows:
1. Update apt package index and install the newest version of all currently installed packages
$ sudo apt-get update
$ sudo apt-get upgrade
2. Use the base installer to install CUDA toolkit and driver packages
For fresh installation, we can religiously follow the installation instruction displayed on the download page:
– Install CUDA repository metada
$ sudo dpkg -i cuda-repo-ubuntu1604_9.2.148-1_amd64.deb– Install CUDA repository GPG keys
$ sudo apt-key adv --fetch-keys http://developer.download.nvidia.com/compute/cuda/repos/ubuntu1604/x86_64/7fa2af80.pub– Update the apt package index
$ sudo apt-get update– Install CUDA toolkit and drivers
$ sudo apt-get install cuda3. Add CUDA 9.2 bin directory to the path and CUDA 9.2 library folder to the library path
$ export PATH=/usr/local/cuda-9.2/bin${PATH:+:${PATH}}
$ export LD_LIBRARY_PATH=/usr/local/cuda-9.2/lib64${LD_LIBRARY_PATH:+:${LD_LIBRARY_PATH}}
We can make this change permanent to the current user by modifying the .profile file
$ vi ~/.profile...
PATH="/usr/local/cuda-9.2/bin:$HOME/bin:$HOME/.local/bin:$PATH"
LD_LIBRARY_PATH=/usr/local/cuda-9.2/lib64${LD_LIBRARY_PATH:+:${LD_LIBRARY_PATH}}
...4. Create the NVIDIA persistence service for optimizing the GPU performance
$ cd /usr/lib/systemd/system && sudo touch nvidia-persistenced
$ sudo vi nvidia-persistenced
=========== nvidia-persistenced =============
[Unit]
Description=NVIDIA Persistence Daemon
Wants=syslog.target

[Service]
Type=forking
PIDFile=/var/run/nvidia-persistenced/nvidia-persistenced.pid
Restart=always
ExecStart=/usr/bin/nvidia-persistenced --verbose
ExecStopPost=/bin/rm -rf /var/run/nvidia-persistenced

[Install]
WantedBy=multi-user.target
5. Enable NVIDIA persistence service
$ sudo systemctl enable nvidia-persistenced6. Disable the default udev rule so that NVIDIA software can initialize the memory with non-default settings
$ sudo vi /lib/udev/rules.d/40-vm-hotadd.rules...
#SUBSYSTEM=="memory", ACTION=="add", DEVPATH=="/devices/system/memory/memory[0-9]*", TEST=="state", ATTR{state}="online"
...7. Reboot the system
$ sudo reboot8. Verify the installation by checking the CUDA driver and toolkit version
– To check the CUDA driver version
$ cat /proc/driver/nvidia/version | grep NVRM | awk '{print $8}'– To check the CUDA toolkit version
$ nvcc --version | grep "release" | awk '{print $6}' | cut -c2-Confirm that the driver version is 396.xx and the toolkit version is 9.2.x
9. Done. CUDA has been successfully installed.
You can now proceed with follow-up installations, for example cuDNN, tensorflow, or Caffe2.
Install to Upgrade by Removing Old Version
It is important to note that upgrading will only work with the same installer type. Since we will be installing using the “deb (network)” installer, make sure that the previous installation was also performed with this installer type. If you installed with another installer type, for example “runfile”, we need to uninstall the version first before performing upgrade.
To uninstall previous CUDA version X.Y that was installed using “runfile”, we run the following commands:
– Uninstalling CUDA toolkit
$ sudo /usr/local/cuda-X.Y/bin/uninstall_cuda_X.Y.pl– Uninstalling CUDA driver
$ sudo /usr/bin/nvidia-uninstallAfter uninstalling the conflicting installed version, we start the upgrade process as follows:
1. Remove the currently installed CUDA packages
$ sudo apt-get purge cuda*
$ sudo apt-get autoremove
$ sudo apt-get autoclean
2. Remove the existing CUDA installation folder
$ sudo rm -Rf /usr/local/cuda*3. Use the downloaded CUDA 9.2 base installer to install CUDA toolkit and driver packages
– Install CUDA repository metada
$ sudo dpkg -i cuda-repo-ubuntu1604_9.2.148-1_amd64.deb– Install CUDA repository GPG keys (optional)
$ sudo apt-key adv --fetch-keys http://developer.download.nvidia.com/compute/cuda/repos/ubuntu1604/x86_64/7fa2af80.pub– Update the apt package index
$ sudo apt-get update– Install CUDA toolkit and drivers
$ sudo apt-get install cuda4. Update the path and library path
$ export PATH=/usr/local/cuda-9.2/bin${PATH:+:${PATH}}
$ export LD_LIBRARY_PATH=/usr/local/cuda-9.2/lib64${LD_LIBRARY_PATH:+:${LD_LIBRARY_PATH}}
We can make this change permanent to the current user by modifying the .profile file
$ vi ~/.profile...
PATH="/usr/local/cuda-9.2/bin:$HOME/bin:$HOME/.local/bin:$PATH"
LD_LIBRARY_PATH=/usr/local/cuda-9.2/lib64${LD_LIBRARY_PATH:+:${LD_LIBRARY_PATH}}
...5. Reboot the system
$ sudo reboot6. Verify the installation by checking the CUDA driver and toolkit version
– To check the CUDA driver version
$ cat /proc/driver/nvidia/version | grep NVRM | awk '{print $8}'– To check the CUDA toolkit version
$ nvcc --version | grep "release" | awk '{print $6}' | cut -c2-Confirm that the driver version is 396.xx and the toolkit version is 9.2.x
7. Done. CUDA has been successfully installed.
Install to Upgrade and Keep Multiple Versions
Starting from CUDA 8.0, it is possible to have multiple versions of CUDA installed in the system. So, if you currently have CUDA 8.0, 9.0, or 9.1 installed and want to install CUDA 9.2 without uninstalling the older version(s), you can opt for this kind of installation. This can be a desired setup if you want to compare the behavior and performance of different CUDA versions.
If you installed the older version via “runfile”, you need to uninstall it first. However, if the installation was performed using “deb (network)”, you can safely proceed with the installation. The steps are outlined as follows.
1. Use the downloaded CUDA 9.2 base installer to update CUDA toolkit and driver packages
– Install CUDA repository metada
$ sudo dpkg -i cuda-repo-ubuntu1604_9.2.148-1_amd64.deb– Install CUDA repository GPG keys (optional)
$ sudo apt-key adv --fetch-keys http://developer.download.nvidia.com/compute/cuda/repos/ubuntu1604/x86_64/7fa2af80.pub– Update the apt package index
$ sudo apt-get update– Install CUDA 9.2 toolkit and drivers via its meta package
$ sudo apt-get install cuda-9-22. Create a new environment file for CUDA 9.2
$ vi ~/cuda92-env.sh#!/bin/sh
export PATH="/usr/local/cuda-9.2/bin:$HOME/bin:$HOME/.local/bin:$PATH"
export LD_LIBRARY_PATH=/usr/local/cuda-9.2/lib64${LD_LIBRARY_PATH:+:${LD_LIBRARY_PATH}}3. To switch to use CUDA 9.2, activate the environment
$ source ~/cuda92-env.sh4. Verify that we are currently using CUDA 9.2
$ nvcc --version | grep "release" | awk '{print $6}' | cut -c2-5. To switch back to the default (older) CUDA version, we simply activate the default environment again
$ source ~/.profile– Verify that we are now back to the older version
$ nvcc --version | grep "release" | awk '{print $6}' | cut -c2-6. Done. We now have multiple versions of CUDA installed in the system
Possible Side Effects
Please note that if you previously installed TensorFlow by building from sources, you may need to rebuild it to CUDA 9.2 environment. However, this is only valid if you install CUDA 9.2 by removing the old version.
Concluding Remark
CUDA installation process is becoming better and more streamlined in the latest version. If you have already installed CUDA in the past and is considering upgrading to a newer version but is afraid of the side effect, this post can be some help to prevent such issue from occurring.
How was your CUDA 9.2 installation experience? Share your finding and gotcha in the comment section below.
Pingback: Guide: Installing Cuda Toolkit 9.1 on Ubuntu 16.04 | Amikelive | Technology Blog
Hi,
Thanks for these instructions.
While trying the – Install CUDA repository metada:”sudo dpkg -i cuda-repo-ubuntu1604_9.2.148-1_amd64.deb”
I get the following error:
cannot access archive: No such file or directory
Errors were encountered while processing:
cuda-repo-ubuntu1604_9.2.148-1_amd64.deb
Do you know what is the problem?
the deb package should have been downloaded first from NVIDIA developer download page. make sure that when you execute the command the deb package is located in the same directory. otherwise you should execute by providing the full path to the deb file as follows:
$ sudo dpkg -i /path/to/cuda-repo-ubuntu1604_9.2.148-1_amd64.debHi,
Many thanks for this useful explanation.
Could you please have a look at the attached result I got after run commands you mentioned because I am still confused which method I should follow.
I have a proper installed version of Nvidia 384 driver but I do not have cuda installed, do I need to remove the Nvidia driver first then only install cuda 9.2 ? (because it already contain Nvidia driver with it).
Many thanks,
Max
max@alienware:~$ nvidia-smi | grep “Driver Version” | awk ‘{print $6}’
384.130
max@alienware:~$ nvcc –version | grep “release” | awk ‘{print $6} | cut -c2-‘
awk: cmd. line:1: {print $6} | cut -c2-
awk: cmd. line:1: ^ syntax error
awk: cmd. line:2: {print $6} | cut -c2-
awk: cmd. line:2: ^ unexpected newline or end of string
The program ‘nvcc’ is currently not installed. You can install it by typing:
sudo apt install nvidia-cuda-toolkit
max@alienware:~$ locate cupti | grep “libcupti.so.” | tail -n1 | sed -r ‘s/^.*\.so\.//’
max@alienware:~$ locate cudnn | grep “libcudnn.so.” | tail -n1 | sed -r ‘s/^.*\.so\.//’
5.1.5
max@alienware:~$ find /usr -name “*libcudnn.so.*” | head -n1 | sed -r ‘s/^.*\.so\.//’
5.1.5
max@alienware:~$ dpkg -l | grep nvidia
ii nvidia-384 384.130-0ubuntu0.16.04.1 amd64 NVIDIA binary driver – version 384.130
ii nvidia-opencl-icd-384 384.130-0ubuntu0.16.04.1 amd64 NVIDIA OpenCL ICD
ii nvidia-prime 0.8.2 amd64 Tools to enable NVIDIA’s Prime
ii nvidia-settings 361.42-0ubuntu1 amd64 Tool for configuring the NVIDIA graphics driver
max@alienware:~$ dpkg -l | grep cuda
ii libcuda1-384 384.130-0ubuntu0.16.04.1 amd64 NVIDIA CUDA runtime library
max@alienware:~$
Hi Max,
Great to know that you found the instruction helpful.
Regarding your issue, you need to uninstall NVidia 384 driver first because it only supports CUDA up to version 9.0. For version 9.2, you need to install NVidia 396 driver. You can check this post that explains the driver installation.
The error you saw was caused by misplaced quote. It should be:
$ nvcc --version | grep "release" | awk '{print $6}' | cut -c2-I have also fixed this error in the post.
Thanks for your replay,
one more question please.
Do you mean that after I uninstall the current version of NVidia 384 driver then I need to install the newer version 396 first then install CUDA 9.2 ?
OR after uninstall the old NVidia driver, I just need to install the CUDA 9.2 ?
in other words, does the CUDA 9.2 already have NVidia 396 driver inside (like windows version)?
Many thanks and best regards.
The NVIDIA display driver has different installation procedure compared to CUDA 9.2. You need to update the driver first (by uninstalling the old driver) and then proceed to CUDA 9.2 installation.
Is TensorFlow even compatible with 9.2 (let alone 10.0 which seems to be the newest version of CUDA)?
Even when the documentation does not explicitly mention about compatibility, it’s still possible to pair TensorFlow with more recent CUDA and have most of the library calls work as expected. Or if you want to take a safer path, you can install multiple versions of CUDA and switch the active version accordingly.
Pingback: CUDA Compatibility of NVIDIA Display / GPU Drivers | Amikelive | Technology Blog
Thanks a lot for this article, I very interested with this published
Thanks for this article guys, really great job!
Thank you Kris for sharing this good and inspiring Stuff. Keep sharing!