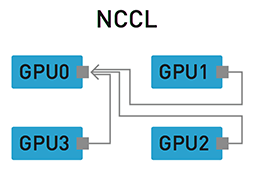
 NVIDIA Collective Communications Library (NCCL) is a library developed to provide parallel computation primitives on multi-GPU and multi-node environment. The idea is to enable GPUs to collectively work to complete certain computing task. This is especially helpful when the computation is complex. With multiple GPUs working together, the task will be completed in less time, rendering a more performing system. People with background or experience in distributed system, such as Hadoop, may immediately relate this concept with similar model applied in the traditional distributed system. Hadoop, for example, supports MapReduce programming model that splits a compute job into chunks that are spread into the slave nodes and collected back by the master to produce the final output.
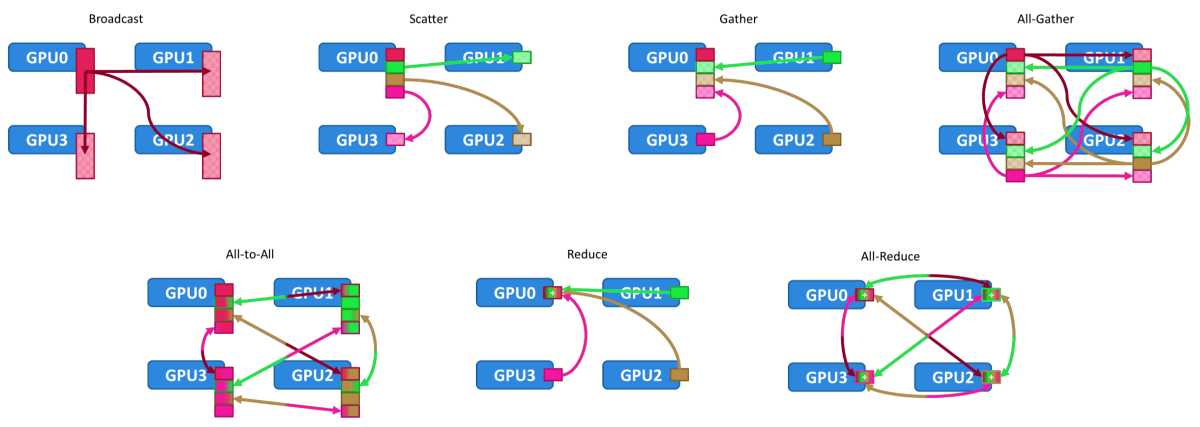
NCCL supports various collective communication patterns that include:
- Broadcast
- Scatter
- Gather
- All-Gather
- All-to-All
- Reduce
- All-Reduce
The communication patterns are described in the following picture. Image is courtesy of NVIDIA.
TensorFlow can also be configured with NCCL for improved performance. To install NCCL for use by TensorFlow on Ubuntu 16.04, the following procedure can be used as a reference.
Step 1: Select or create a directory to store the installer file.
We will create a new directory named installers/nccl in the user’s home directory.
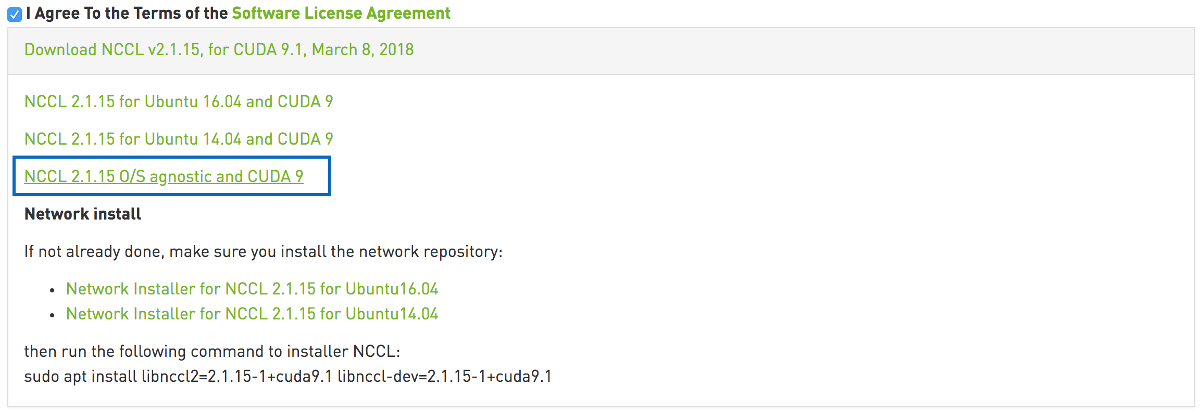
$ cd && mkdir -p ~/installers/ncclStep 2: Download NCCL deb package from NVIDIA website (https://developer.nvidia.com/nccl/nccl-download) and put into the installer directory
From the download options, ensure that the OS agnostic installer is chosen as shown in the picture below.
Step 3: Extract the tar file
For NCCL 2.1.15 and CUDA 9.1, the tar file name is nccl_2.1.15-1+cuda9.1_x86_64.txz
$ tar -xvf nccl_2.1.15-1+cuda9.1_x86_64.txzStep 4: Copy the extracted directory to /usr/local
$ sudo mkdir -p /usr/local/nccl-2.1
$ sudo cp -vRf nccl_2.1.15-1+cuda9.1_x86_64/* /usr/local/nccl-2.1
Step 5: Add NCCL library into LD_LIBRARY_PATH
$ vi ~/.profile...
LD_LIBRARY_PATH=“/usr/local/nccl-2.1:/usr/local/cuda-9.1${LD_LIBRARY_PATH:+:${LD_LIBRARY_PATH}}"
..Note: the statement ${LD_LIBRARY_PATH:+:${LD_LIBRARY_PATH}} is an example of parameter expansion. The pattern used in the declaration is ${parameter:+word}. If $LD_LIBRARY_PATH is unset, the parameter value is an empty string. However, when $LD_LIBRARY_PATH is already set, the parameter value will be replaced with “:$LD_LIBRARY_PATH” (without the quotes). You can read more about parameter expansion in this article.
Step 6: Create symbolic link for NCCL header file
$ sudo ln -s /usr/local/nccl-2.1/include/nccl.h /usr/include/nccl.hInstallation is now complete. You can now incorporate NCCL in your GPU-accelerated application. In the upcoming post, we will discuss how NCCL should be configured for use by TensorFlow.
What programming model does Hadoop support to manage distributed compute jobs?