 Maven installation on Windows is very straightforward. Nonetheless, this post will provide sufficient elaboration to ensure a smooth installation. Following the installation, some configuration and testing tasks may need to be completed prior to creating the first Maven project.
A prerequisite for Maven installation is Java JDK. If you have not installed the Java SDK, you can refer to the installation procedure explained in this post.
The installation and configuration steps are executed in order as follows:
1. Download Maven zip package from the download page
Maven download page URL is http://maven.apache.org/download.cgi.
In this post, we will install and configure Maven 3.2.3. It can be anticipated that the installation procedure of the newer version of Maven will be quite similar with the one explained in this article.
2. Extract the zip into an installation directory of preference.
In this article, the directory contained in the extracted zip package is moved into “D:\Devs\DevHome\Maven\Bundle\apache-maven-3.2.3”. There is no strict rule regarding the installation directory. You can put the Maven directory in any directory of your choice.
3. Modify Maven configuration file settings.xml
The configuration file is located in the conf folder of the installation directory. For example, if we install Maven to “D:\Devs\DevHome\Maven\Bundle\apache-maven-3.2.3”, the configuration file path will be “D:\Devs\DevHome\Maven\Bundle\apache-maven-3.2.3\conf\settings.xml”.
The configuration file contains various configuration properties that alter the behavior of Maven. Among all the properties, the following properties may often become the one we will be mostly interested in:
- localRepository: This property hints Maven the directory path where local Maven repository will be created to locally store dependency files that include library, bundle, and pom files
- proxy: This property supplies information about the proxy server that should be used by Maven when connecting to the external network to download dependency files or update its index.
- profile: This property mainly holds information about repositories to look up from when resolving dependencies. There can be several profiles configured in the same settings.xml file
- activeProfile: This property indicates the profile that is always activated by Maven in its build lifecycle
A sample working settings.xml is provided below to give you an idea about the configurations. In the file, it can be seen that the local repository is set to a custom directory “D:\Devs\DevHome\Maven\Repo\.m2\repository”. Traditionally, the repository is set to be contained within the user’s home directory denoted as “%USERPROFILE%\.m2\repository”.
<?xml version="1.0" encoding="UTF-8"?>
<settings xmlns="http://maven.apache.org/SETTINGS/1.0.0"
 xmlns:xsi="http://www.w3.org/2001/XMLSchema-instance"
 xsi:schemaLocation="http://maven.apache.org/SETTINGS/1.0.0 http://maven.apache.org/xsd/settings-1.0.0.xsd">
 <localRepository>D:\Devs\DevHome\Maven\Repo\.m2\repository</localRepository>
 <interactiveMode>true</interactiveMode>
 <offline>false</offline>
 <pluginGroups></pluginGroups>
 <proxies></proxies>
 <servers></servers>
 <mirrors></mirrors>
 <profiles>
   <profile>
     <id>base</id>
     <repositories>
       <repository>
         <id>maven-central</id>
         <url>http://repo2.maven.org/</url>
       </repository>
       <repository>
         <id>ibiblio</id>
         <url>http://mirrors.ibiblio.org/pub/mirrors/maven/</url>
       </repository>
       <repository>
         <id>codehaus</id>
         <url>http://repository.codehaus.org/</url>
       </repository>
       <repository>
         <id>javanet</id>
         <url>https://maven.java.net/content/groups/public/</url>
       </repository>
       <repository>
         <id>apache-release</id> <url>https://repository.apache.org/content/repositories/releases</url>
         </repository>
     </repositories>
   </profile>
 </profiles>
 <activeProfiles>
   <activeProfile>base</activeProfile>
 </activeProfiles>
</settings>
4. Set a new environment variable M2_HOME which points to the Maven installation directory.
a. From taskbar, click Windows icon and right click on Computer and choose Properties.

Selecting Properties from Computer menu in Windows startup menus
b. From Control Panel Home menus on the left, choose Advanced System settings

Advanced system settings menu in Control Panel Home
c. After the “System Properties” window pops up, choose Environment Variables.

Environment variables button in the Advanced tab
d. Create a new environment variable named M2_HOME. In this example, we set the value to ” D:\Devs\DevHome\Maven\Bundle\apache-maven-3.2.3″

“New” buttton to create a new environment variable
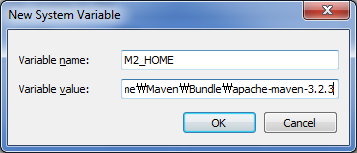
Creating “M2_HOME” as a new system variable
e. Click OK to apply the change
5. Add Maven bin directory into the executable path
a. From “Environment Variables” popup window, locate the variable Path in the “System variables section” and click Edit.

Variable “Path” in the System Variables section
b. Append %M2_HOME%\bin into the Path value. Don’t forget to prefix with semicolon to separate with the previous entry.
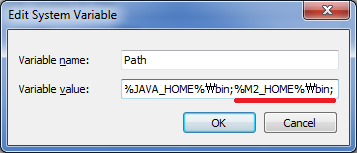
Maven binary directory addition into executable paths
6. Verify Maven has been properly configured
a. Press Windows + R and type cmd
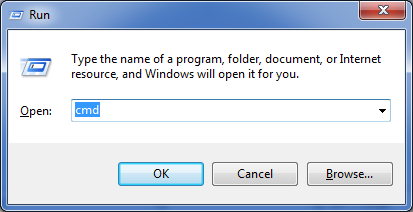
Windows + R followed by “cmd” command
b. Type “echo %M2_HOME%” to verify the value of the currently installed Maven

Verifying the value of Maven environment variable
c. Type “mvn -version” to get information about the version of Maven installed and verify that the configuration has been successful.
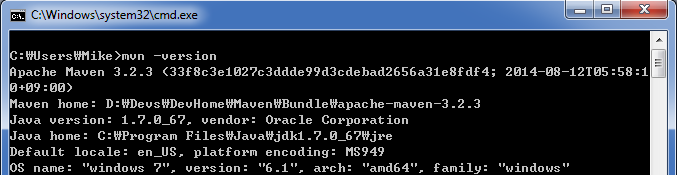
The sample output when executing the command “mvn -version”
Alright, now we are all set. We are ready to create our first Maven project. Stay tune for the next post in the Maven tutorial series.