When you start to develop web application using Java, you may think to use Eclipse as the IDE. Assume that you have seen a good tutorial about Java servlet on the internet or read the chapter of a book discussing about web development using JSP.
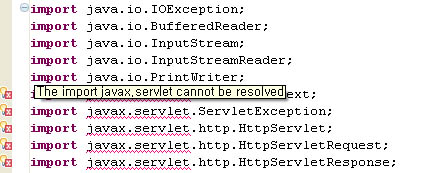
You are now writing the first servlet by using the wizard provided by the IDE. However, as soon the template file is loaded on the source code editor, you encounter the infamous error “The import javax.servlet cannot be resolved” just like depicted in the figure below.
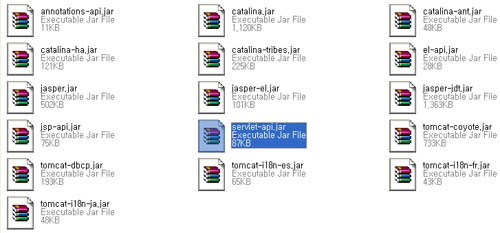
This error is normal. Servlet library is not shipped by default in Eclipse. You also can’t find the library in JRE/JDK package you download. Instead, you will find it in the lib folder under Tomcat installation directory like depicted below.
So, how can we resolve the error? The solution is apparently simple. We just need to add the servlet jar file into the build path. Based on the scope, we can achieve this using two methods; single project-wise and all projects-wise. Both methods will be explained immediately. You just need to pay attention that these methods were tested under the following system environment and steps in other environment may vary:
OS: Windows
Eclipse version: Eclipse 3.5 Ganymede
JDK version: JDK 1.6.0_14
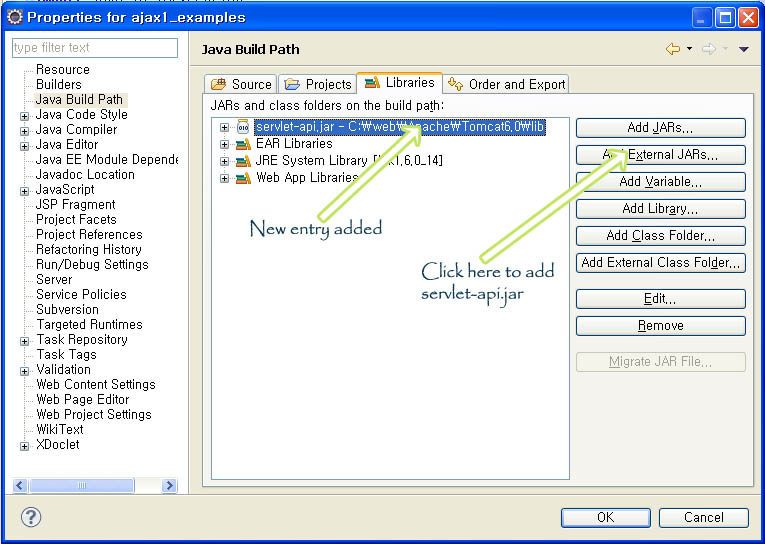
In the first method, we add the servlet-api jar by right-clicking the project name and choose Properties option. After clicking, a new popup window will appear. Click the “Java Build Path” menu on the left followed by choosing “Libraries” tab. Subsequently, click “Add External JARs” button and point to servlet-api.jar in lib folder of Apache Tomcat installation directory. If you do all these steps correctly, you will notice that servlet-api.jar has been added into the libraries. Please check your result with the reference picture below.
Click “OK” to complete the modification. After a glance, you will notice all imports errors have been disappeared.
The first method is good if you rarely work with servlet. If you yourself are a very busy developer who has to build numerous projects for your vast client base, it is considerably wise to apply the second method. In this method, we will add the servlet-api.jar into the JDK directory. After the modification, you will never encounter the error again as the servlet-api.jar will always be in the build path. This is different with the previous method which requires you to modify the project properties again if you create a new dynamic web project.
To execute the second method, follow the instructions below:
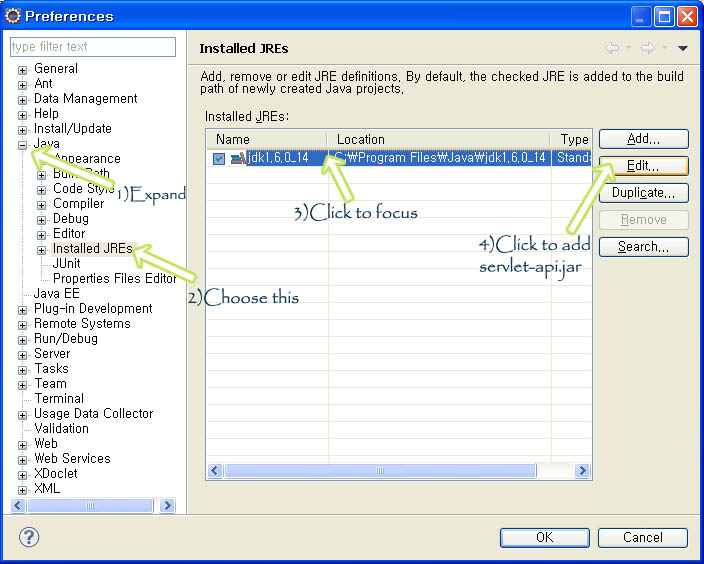
1. In Eclipse workbench, choose Window > Preferences
2. Choose Java > Installed JREs on the left menu
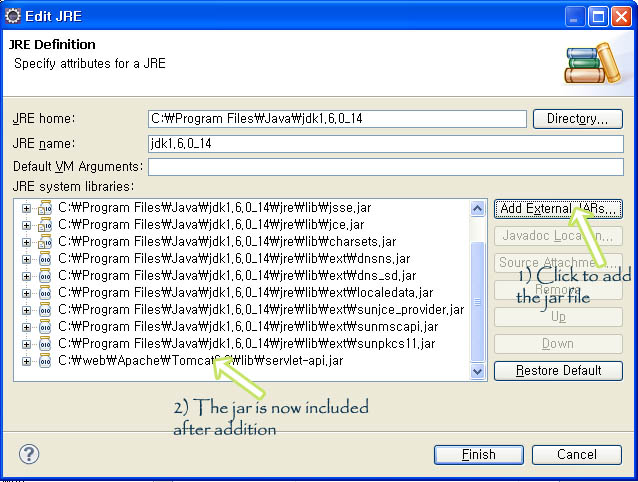
3. Focus on the JDK you want to modify, click “Edit”. A new popup will appear
4. Click “Add External JARs” and point to servlet-api.jar in lib folder of Tomcat installation directory.
5. Click “Finish” to close the second popup and “OK” to complete the modification
After you do all the steps, all the servlet import errors in the source code editor will have vanished. You will also have discarded the import error for all projects which require the servlet functionalities.

great job
You got it spot on dude
really good.great job…keep going
good job 🙂
really helpful
This is reall helpful. Thank you!
very helpful. Thanks you!
got it!!
thnq
why didn’t i find u earlier
Good Advice. bravo
Very very thanks ,I am facing this problem for two days, but cant resolved
very helpful quick solution
thank you, resolved.
worked first method. THANK YOUUU (:
Thank you , it worked
Thanks a lot. It solved my problem.Way to go.
Thanks a lot… 🙂
Thank you! This was exactly what I needed.
Thanks a lot. I was breaking my head for this,. Luckily i came across your post. Was very useful.
it worked just fine..thanks a ton 🙂
Another way to solve this problem is to add tomcat in your preference and select it as your default server. This ensures that the servlet api would be available. This also eliminates the import issue.
Very helpful post.
Very Helpful..thank you very much
Thanks a lot.It is very useful.It solves my problem.
Thanks man, took me a while trying to get this to work until I found this page
Great job dude 😉
Thanks for saving me a lot of head scratching. Not a java developer by trade so relying on tips like this to help me get this darn project working!
Very clear explanation! It resolved my issue. Thanks Man.
thanks for helping….it work correctly
thanks a lot .its working
Great job and a huge thanks..
thanks man u did a great job!!!
fluent work,thanks!
i import the servlet api but servlet error does not remove
Seems good among all the solution seen so far…Hope it works…and thanks in advance…bookmarking U…!!!
Awesomee… gud work
Thanks bro!
Just in case you’re using Glassfish 4.0 Server,
try these steps :
– right-click project > properties > Project Facets > Glassfish Web Extention > Runtime > checklist GlassFish Instance (eg : GlassFish 4.0 at Localhost)
– click Apply
It works fine..
It helped so much!!!
Thanks lot! It worked 🙂
thanks a lot, that’s really helped me, thanks a lot brothers
This was very helpful. I have been trying to resolve this for a long time.
First I thought this is non-sense, but it worked 🙂
You do this by setting a Targeted Runtime. This is set in the Project properties. In Eclipse, go to Project -> Properties, then click on the Targeted Runtimes page. On that page, you can select the runtime (application server) your application will use.
Thanks a lot!
Thank you so much, really it was too helpful.
Thanks a lot!
Hey, thanks a lot. That was to the point and elaborately described.
Thank you bro
Thank you! Your instructions are precise — very helpful.
I was struggling with this today. Did multiple things, but nothing worked. You are a lifesaver.
Good to know the workaround still works in 2022. At the same time, it is unfortunate that Eclipse users still face the same issue 12 years after the article was published.